This article explains how to set up the Smartsheet Jira Connector with both Jira Cloud and Jira Self-hosted Server.
USM Content
The Smartsheet Jira Connector is a premium add-on. Contact the Smartsheet sales team for pricing.
The Smartsheet Jira Connector syncs data between Smartsheet and one or more Jira instances. Use it to create workflows that link Jira issues to rows, columns, and cells in Smartsheet.
If the Jira Connector is already on your plan, sign in to the Smartsheet Jira Connector to get started.
Sign in to the Smartsheet Jira Connector
Terminology and permission types
Two terms define how the Jira Connector is structured:
- Connection: The link between Smartsheet and a specific Jira instance.
- Workflow: The link within the Jira Connector that connects Jira elements to a Smartsheet sheet.
Three permission types control access to the Jira Connector:
- Smartsheet System Admin: Manages Jira Connector Admins and Jira Connector Users from within Smartsheet. System Admins can also enable a setting to restrict Connector access.
- Jira Connector Admin: Establishes the connection between a Jira instance and the Smartsheet Jira Connector.
- Jira Connector User: Creates workflows to sync information between Smartsheet and Jira.
Features by permission type
The following table shows which permissions are required to complete specific tasks using the Jira Connector.
| Smartsheet System Admin | Jira Connector Admin | Jira Connector User | |
|---|---|---|---|
| Create connection | Yes | Yes | No |
| Create workflows | Yes* | Yes* | Yes |
| Edit own workflows | Yes* | Yes* | Yes |
| Deactivate own workflows | No | No | Yes |
| See all workflows in the organization | Yes | Yes | No |
| Deactivate any workflow in the organization | Yes | Yes | No |
| Enable or run any workflow in the organization | No | No | No |
| Assign Jira Connector User role | Yes | Yes | No |
| Assign Jira Connector Admin role | Yes | No | No |
| Enable Restrict Access setting | Yes | Yes | No |
| Add individuals to the Restrict Access list (after restrictions have been enabled) | Yes | Yes | No |
* Smartsheet System Admins and Connector Admins can create and edit workflows when the restrict access feature is enabled. If your System Admin activates the Restrict Users setting in the Jira Connector, you must also hold the Jira User role in Smartsheet. See Restrict access to the Smartsheet Jira Connector.
Before you begin
Use a shared account for setup
Set up the connection using a shared, licensed email account (for example, smartsheet-jira@yourdomain.com) for both Smartsheet and Jira. Connection ownership can't be transferred. If the person who created the connection leaves your organization, you must rebuild the connection from scratch. A shared account prevents that.
Configure your firewall
Configure your firewall settings before you begin any connection setup.
Required permissions
In Jira:
- Jira System Admin (Product Admin or Org Admin)
In Smartsheet:
- Member (user model) or Licensed user (legacy model)
- Smartsheet System Admin role, Smartsheet Jira Connector Admin role, or both
Only one of the Smartsheet roles is required, but Smartsheet recommends holding both.
Because the Jira Connector runs automatic workflows, it needs Jira System Administrator credentials to create and configure webhooks via the Jira REST API. Those credentials are used only for webhook setup.
Keep the setup account active. The account used for the connection must stay active and retain Admin rights in both Jira and Smartsheet. If that user loses Admin status, the connection breaks with the error: Missing user credentials for this endpoint. Restoring Admin permissions resumes the sync. If Jira Admin credentials are removed entirely, you must rebuild the application link because the tokens change.
Set up the connection
The Smartsheet Jira Connector is compatible with Jira Cloud and Jira Data Center. The steps vary by deployment type and OAuth version. Use this table to follow the path that matches your setup:
Deployment | Auth type | Steps |
|---|---|---|
OAuth 1.0 | 1. Register new Jira Server → 2. Create Application Link → 3. Edit the App Link → 4. Complete Connection | |
OAuth 2.0 | 1. Register new Jira Server → 2. Complete Connection | |
OAuth 2.0 | 1. Create App Link → 2. Register new Jira Server → 3. Complete Connection |
You can create up to three connections per Jira Cloud instance with OAuth 2.0.
Jira Cloud or Data Center OAuth 1.0
Step 1: Register a new Jira Server in the Smartsheet Jira Connector
- Sign in to the Smartsheet Jira Connector. If prompted to allow access to your Smartsheet account, select Allow.
- Select the menu in the upper-left corner of the page and then select Account Admin.
- Select Register New Jira Server.
- On the Settings page:
- Enter the JIRA Host URL for the Jira environment you want to connect (for example, https://mbfcorp.atlassian.net/).
- The JIRA API URL is typically the same as your JIRA Host.
- For Name, accept the default or enter a more descriptive name.
- Select your JIRA Version. For Jira Cloud instances, select Jira Server 7 or Cloud.
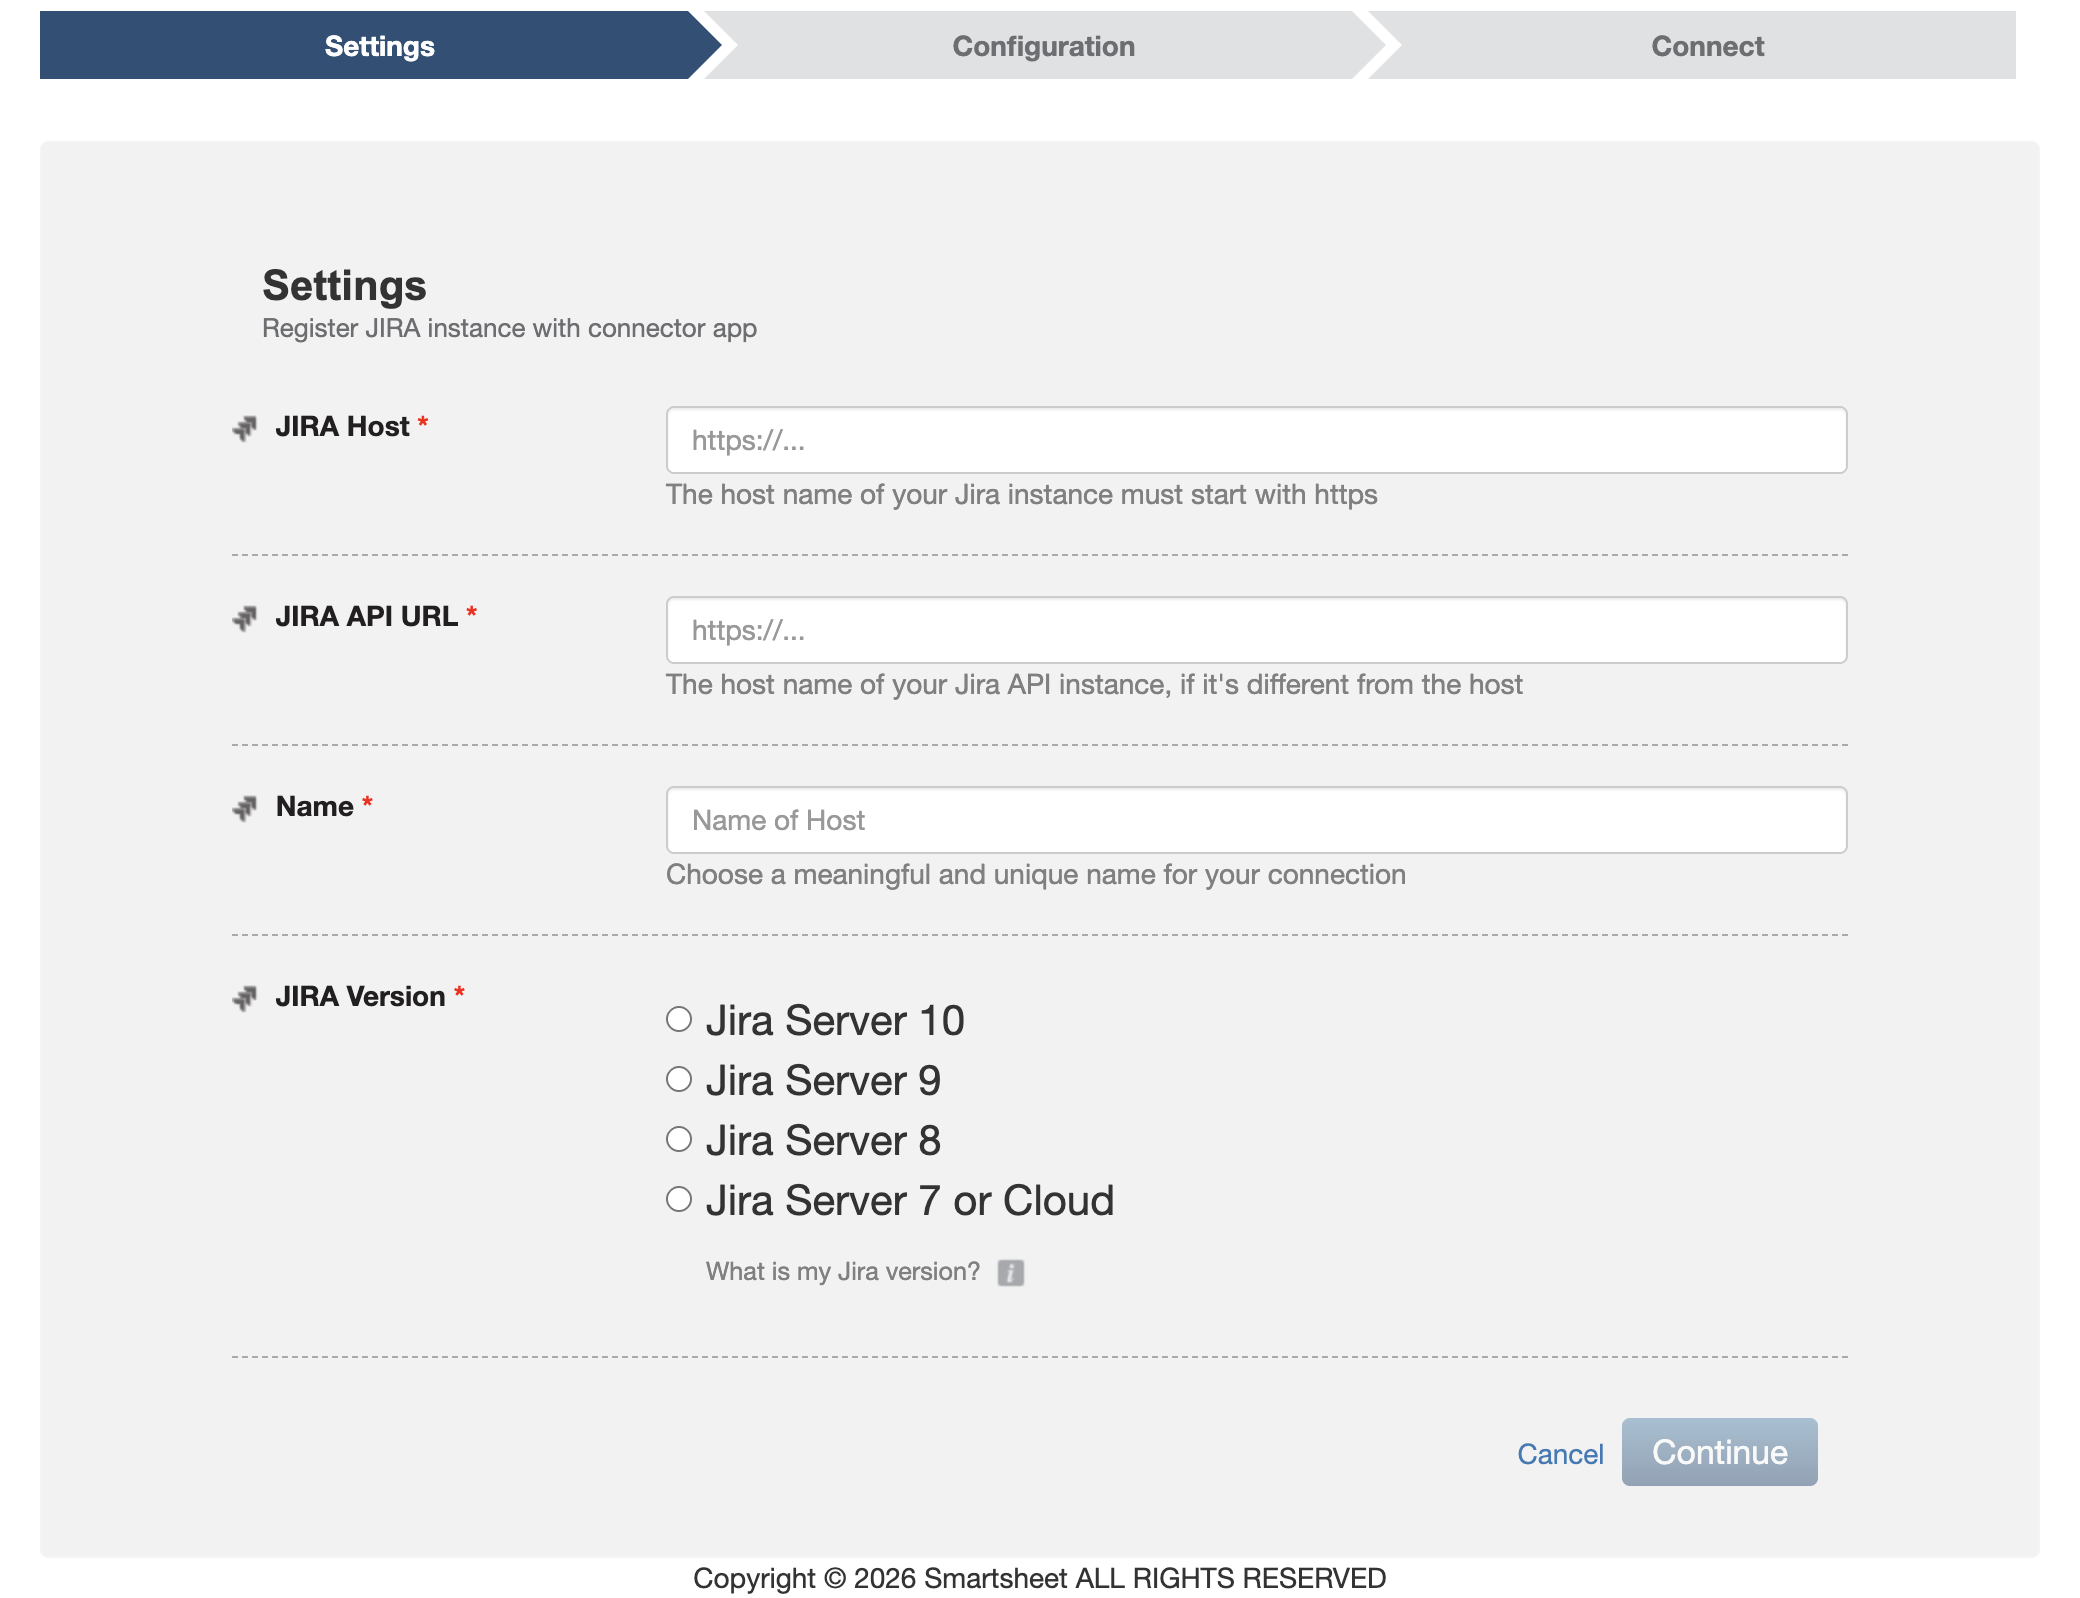
- Select Continue.
- On the Configuration page, copy the Consumer Key, Consumer Name, and Public Key. You use these in the next steps.
- Select Continue.
Step 2: Create an Application Link (AppLink) to Smartsheet in Jira
- Sign in to Jira with Jira Administrator permissions.
Go to Settings > Products.
Brandfolder Image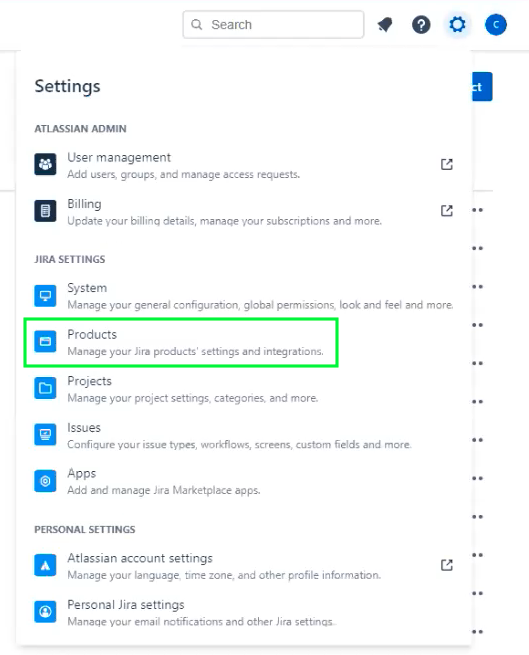
In the Products sidebar, under Integrations, select Application links.
In earlier self-hosted versions of Jira, go to Settings > Applications, then select Application links.
Brandfolder Image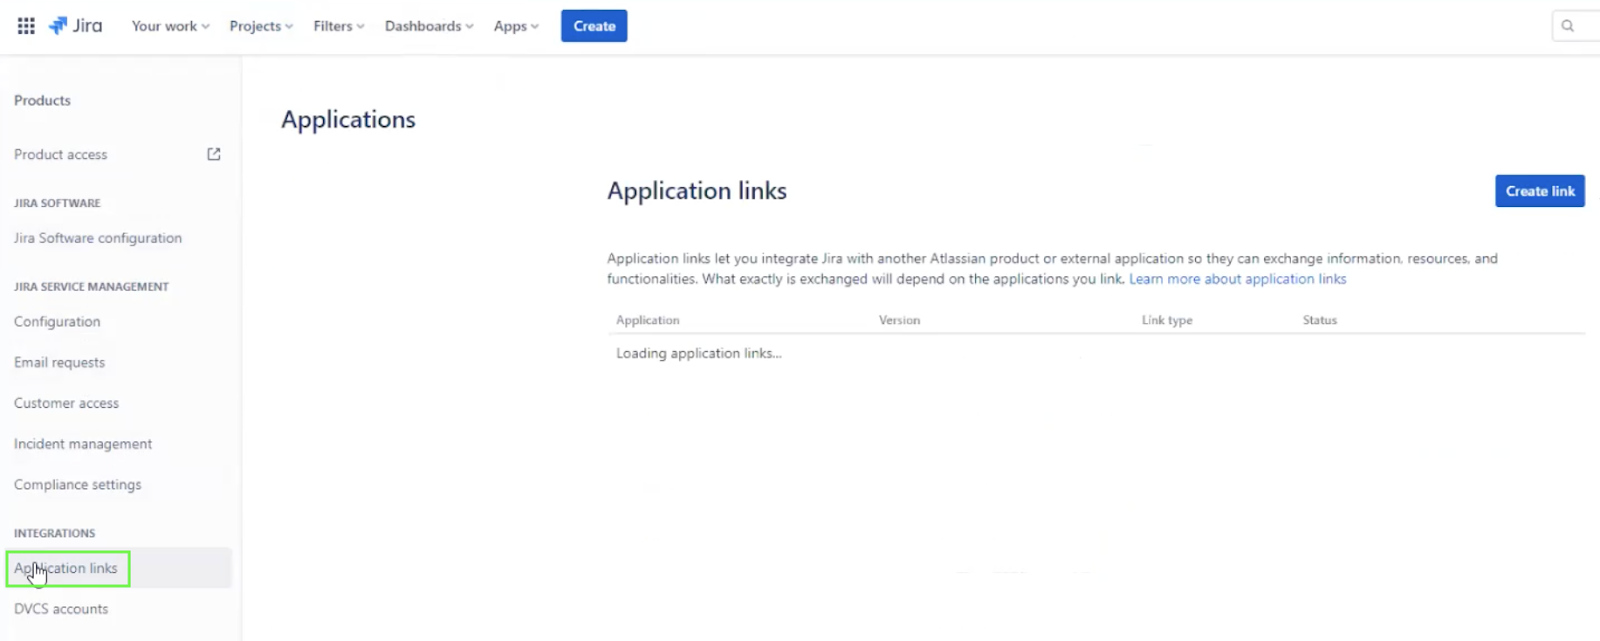
- Select Create link. In the dialog that appears, fill in the fields:
Jira Cloud: Select Direct application link and enter https://app.smartsheet.com as the Application URL. Select Next.
Brandfolder Image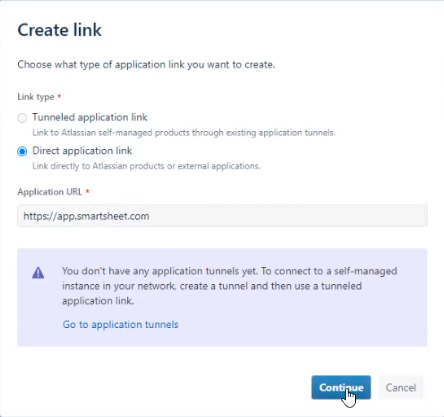
Jira Data Center v9 and later: Select Atlassian product and enter https://app.smartsheet.com as the Application URL. Select Continue.
Brandfolder Image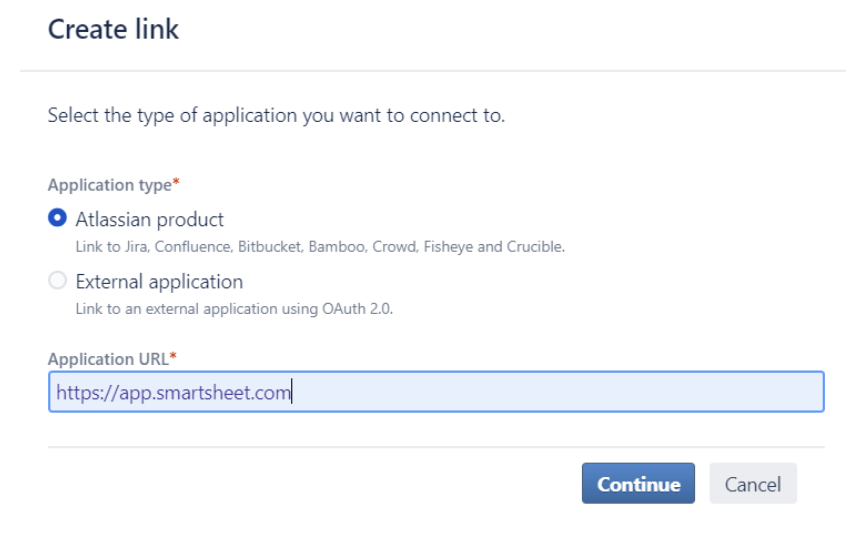
- When prompted with a redirect or validation warning, select Continue and leave the URL unchanged.
- In the Review link or Link applications dialog that appears, fill in the fields:
- Application Name: Smartsheet.
- Application Type: Generic Application (accept the default).
- Jira Data Center v9 and later only: Check Create incoming link.
Select Continue.
Brandfolder Image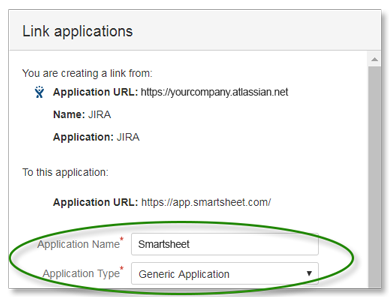
Step 3: Edit the Application link
- Find the Application Link you created in Step 2. Select the three-dot menu (hover to reveal it) or the Edit icon (version dependent).
In the Configure dialog, select Incoming Authentication.
Brandfolder Image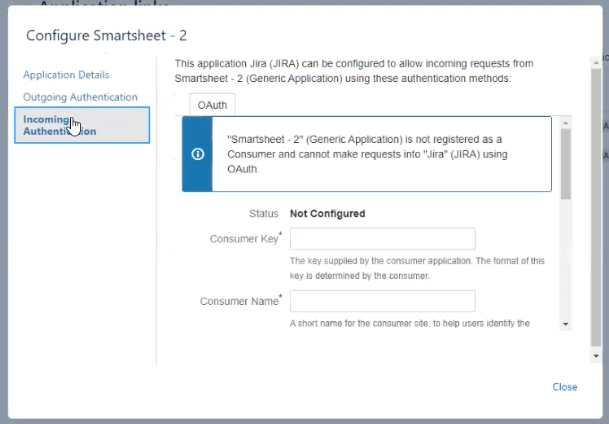
- Fill in the fields:
- Service Provider Name (if shown): Smartsheet
- Consumer Name: Paste in the Consumer Name you copied in Step 1
- Consumer Key: Paste in the Consumer Key you copied in Step 1
- Public Key/Shared Secret: Paste in the Public Key you copied in Step 1
- Description: Optional
- If Request Token URL, Access Token URL, or Authorize URL are required in your Jira environment, enter https://api.smartsheet.com/2.0/token in each field.
- Select Save, then Close.

Step 4: Complete the Smartsheet Jira Connection
- Return to the Smartsheet Jira Connector configuration.
On the Connect screen, select Connect.
A dialog asks you to allow Smartsheet to read and write to your Jira environment.
Select Allow.
The connection is now active. Members (licensed users in the legacy model) can create workflows between Jira and Smartsheet.
To connect additional Jira environments, repeat these steps for each additional instance.
Jira Cloud OAuth 2.0
Step 1: Register a new Jira Server in the Smartsheet Jira Connector
Set up your firewall settings and configuration before setting up this connection.
- Sign in to the Smartsheet Jira Connector. If prompted to allow access to your Smartsheet account, select Allow.
- Select the menu in the upper-left corner of the page and then select Account Admin.
- Select Register New Jira Server.
- On the Settings page:
- Enter the JIRA Host URL for the Jira environment you want to connect (for example, https://mbfcorp.atlassian.net/).
- The JIRA API URL is typically the same as your JIRA Host.
- For Name, accept the default or enter a more descriptive name.
- Select your JIRA Version. For Jira Cloud instances, select Jira Server 7 or Cloud.
Select Continue.
On the Configuration page, A message appears stating: Your JIRA connection is already configured.
- Select Continue.
Step 2: Complete the Smartsheet Jira Connection
On the Connect screen, select Connect.
A dialog asks you to allow Smartsheet to read and write to your Jira environment.
- Select the host from the Use app on dropdown.
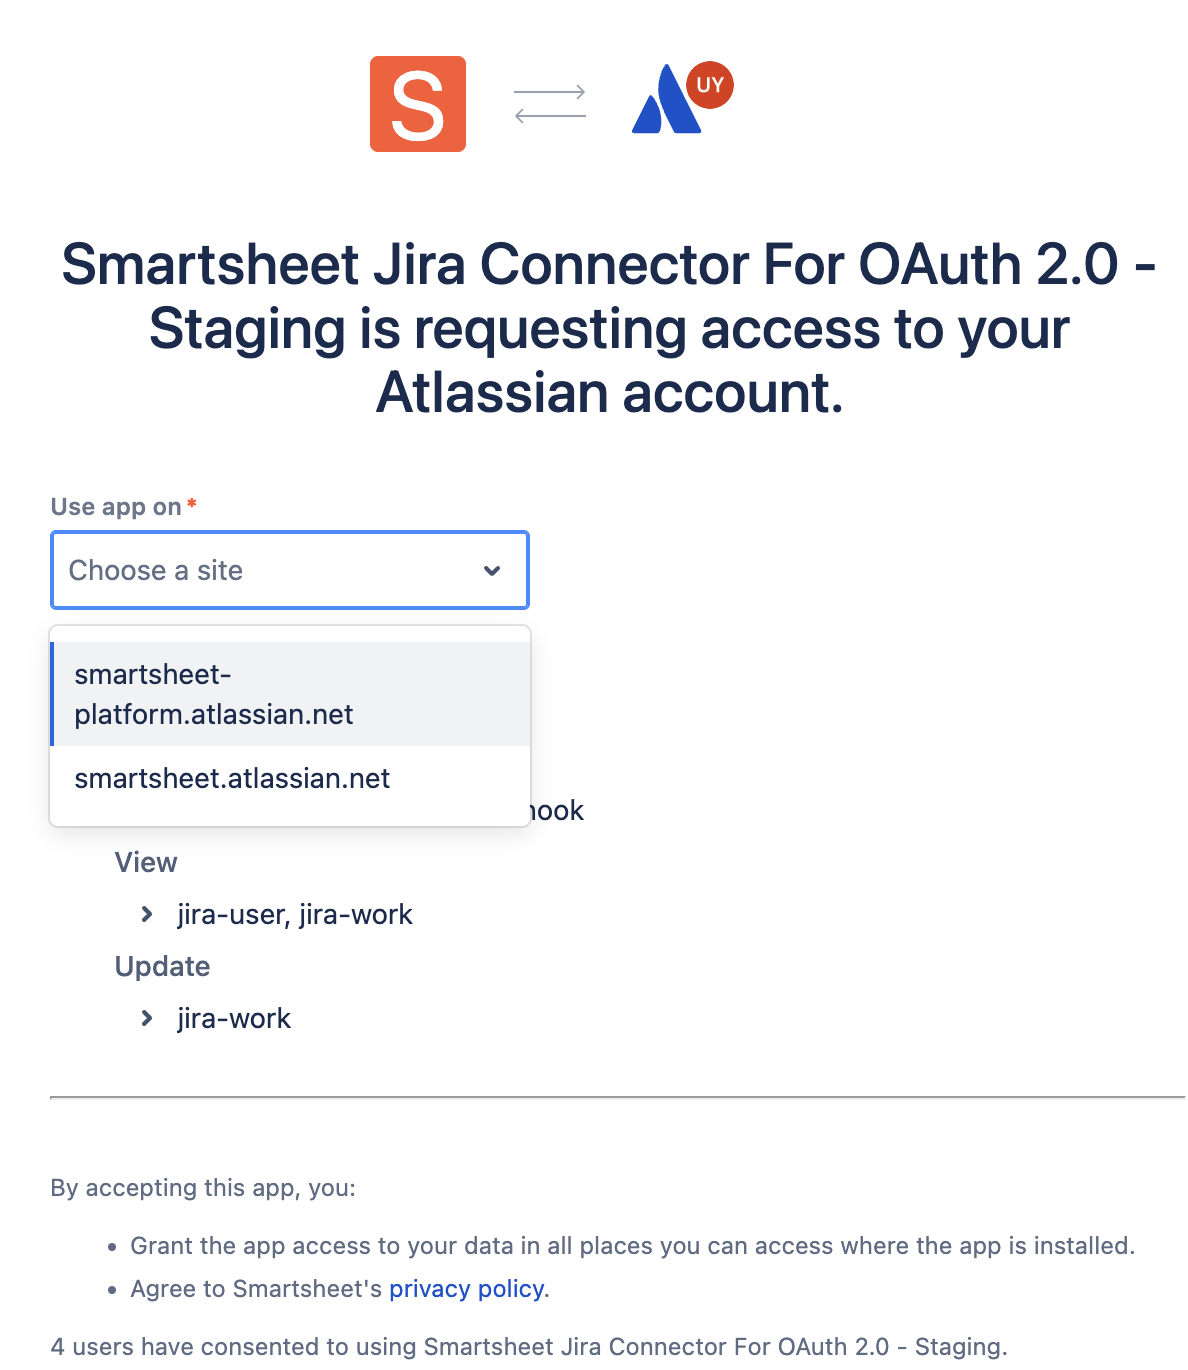
- Select Allow.
The connection is now active. Members (licensed users in the legacy model) can create workflows between Jira and Smartsheet.
To connect additional Jira environments, repeat these steps for each additional instance.
Jira Data Center OAuth 2.0
Step 1: Create an Application Link (AppLink) to Smartsheet in Jira
- Sign in to Jira.
- Go to Settings > Applications.
In the Applications sidebar, under Integrations, select Application links.
If Applications doesn't appear under Settings, go to Products instead. Look for Application links under Integrations in the Products sidebar.
- Select Create link. In the dialog that appears, fill in the fields:
- Application Type: External Application
- Direction: Incoming
- Select Continue
- Configure the incoming link:
- Name: Enter a descriptive name
- Redirect URL: {smartsheet-connector-host}/c/jira/signInCallback}. Note that smartsheet-connector-host differs for each region:
- Application Permission: System Admin
- Select Save.
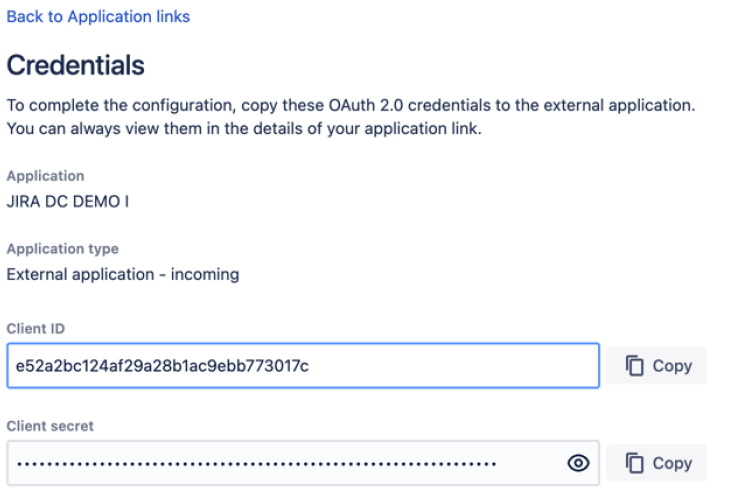
When the step completes, Jira displays a Client ID and Client Secret. Copy both values, as you need them in Step 2.
Step 2: Register a new Jira Server in the Smartsheet Jira Connector
- Sign in to the Smartsheet Jira Connector. If prompted to allow access to your Smartsheet account, select Allow.
- Select the menu in the upper-left corner of the page and then select Account Admin.
- Select Register New Jira Server.
- On the Settings page:
- Enter the JIRA Host URL for the environment you want to connect (for example, https://mbfcorp.atlassian.net/).
- The JIRA API URL is typically the same as your JIRA Host.
- For Name, accept the default or enter a more descriptive name.
- Select your JIRA Version.
- Select Continue.
- On the Configuration page, enter the Client ID and Client Secret you copied in Step 1.
Step 3: Complete the Smartsheet Jira Connection
- Select Continue.
On the Connect screen, select Connect.
A dialog asks you to allow Smartsheet to read and write to your Jira environment.
- Select Allow.
The connection is now active. Members (licensed users in the legacy model) can create workflows between Jira and Smartsheet.
Restrict access to the Smartsheet Jira Connector
Permissions in both Smartsheet and Jira always control what a user can do in the Connector, regardless of whether additional restrictions are enabled. For example, if the person who created a workflow doesn't have permission to edit specific project data in Jira, the workflow can't edit that data through the Connector.
To limit which users can build workflows, the Smartsheet System Admin or Jira Connector Admin can turn on the Restrict Access setting.
Turn on Restrict Access
- Sign in to the Smartsheet Jira Connector with your Smartsheet credentials.
- Select the menu icon in the upper-left corner and select User Management.
Check Restrict which users can access the Smartsheet JIRA Integration.
Brandfolder Image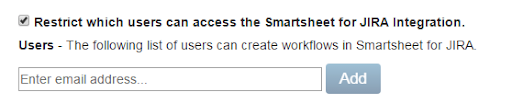
- Add the email address of each user who should have access.
Remove a user
Users removed from the list lose the ability to create or edit workflows.
- Sign in to the Smartsheet Jira Connector with your Smartsheet credentials.
- Go to User Management.
- Select the Delete icon to the right of that user's account information.