Convert HTTP Call module usage to the new Call API feature
Understand this feature and how you can use it to replace the HTTP modules you may be using in your workflows today.
The new API Call tool makes managing the HTTP calls you're making across your automation workflows in Bridge easier. The new tool has two main components:
- Profiles: Profiles retain information about the system APIs you want to connect your workflows.
- Make API Call module: This module uses profile data and specific details you provide to make an HTTP call to a system API.
Profiles make it easy to change workflows using that Profile if key information changes, like your authorization token or the Base URL. An update to the Profile ensures that all modules calling the profile get the latest data to make the call.
Get started
These instructions only apply to Bridge's default (US) region. The EU region doesn't have the HTTP module. Learn more about regional differences.
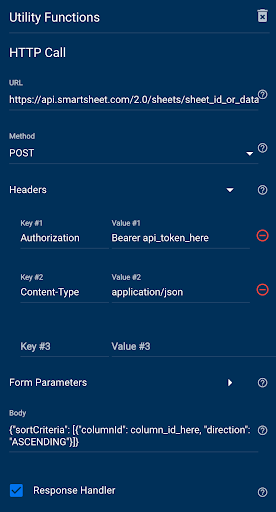
In this walkthrough, we'll convert the information from a single HTTP module into a workflow to use the new Call API feature. Here's what the HTTP module we're going to convert looks like:
Set up your first Profile
Profiles save critical information for the system APIs you want to connect your workflows to. When you select a Profile in the Make API Call module, some of the information required to make your API call will already be set up for you.
To convert your HTTP module usage to the Call API tool, the first step is to copy some of the information from your module and set up your first profile:
- Log into your Bridge account.
- Navigate to the Integrations tab.
- Select the Call API utility.
Select Add to Profiles.
Brandfolder Image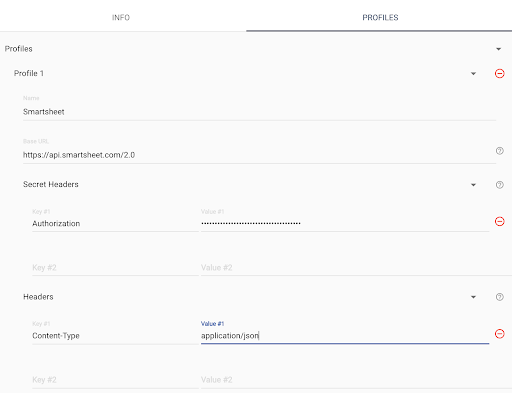
- Name your Profile. Each Profile name must be unique.
- Add the Base URL for the system API you want to connect to.
- You can copy the Base URL from your HTTP module and leave out the endpoint details. In this example, the Base URL part of the value has been copied from the URL field in the HTTP module.
- Under Secret Headers, add any headers that contain tokens or secret information (e.g., API tokens).
- In this example, the Authorization header details have been copied from the HTTP module into a new secret header for the profile.
- Under Headers, add any headers that should be included in all API calls you make with this profile.
- In this example, the Content-Type header details have been copied from the HTTP module into a new header for the profile.
- Save the Profile.
The Base URL is the part of the system API's URL that will always remain the same, no matter what you try to do in that system. The endpoint in the Make API Call module allows you to include the specific details and actions you need to take with that API call. Example: We're using the Smartsheet API to sort a sheet. The Base URL for our Smartsheet API Profile is https://api.smartsheet.com/2.0 and the specific action we're taking with the module is to sort a particular sheet, so we'll put sheets/sheet_id_or_data_reference_here/sort in the Endpoint field of the module.
Set up the Make API Call module in your workflow
Now that your profile is ready, you can set up the Make API Call module to replace any HTTP modules connecting to that system's API.
Drag the Make API Call module into the workflow under the HTTP module.
If you still need to set up an API Profile, refer to the previous section for instructions.
- Select your desired Profile from the dropdown.
- In the Endpoint field, include the portion of the URL field that wasn't added to the Base URL field in the profile.
- many fields will match the HTTP module from here, and you need to copy/match the setup. Note that you may not use all these fields.
- Set the Method field
- Copy and paste the Body field
- Copy any Form Parameters (if using)
Confirm that all fields that aren't Profile-specific are matching.
Brandfolder Image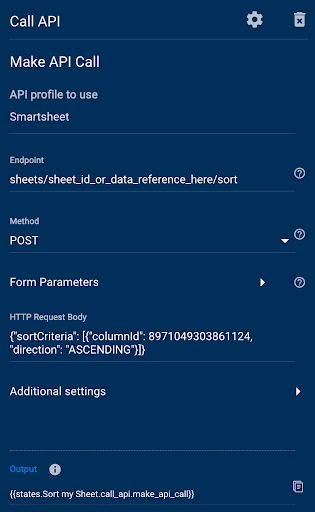
- Delete the HTTP module.
- Save your changes.
Additional settings
- You don't need to convert the Response Handler checkbox from the HTTP module into the new Make API Call module.
- The new module returns all API calls as JSON objects. If you need the response to be a string, you can check the Return raw response checkbox under Additional settings in the module.
- If you need to include additional headers for a specific call, copy them into the HTTP Request Headers section.
Notes
Suppose any later part of your workflow uses data references from the HTTP module. In that case, these data references should be replaced with references from the new module or modified to refer to the new module.
Here are some examples with the differences bolded:
- {{states.startstate.call_api.make_api_call.response.message}
- {{states.startstate.utilities.httpcall.message}
- {{states.startstate.call_api.make_api_call.response.result.0.cells.0.columnId}
- {{states.startstate.utilities.httpcall.result.0.cells.0.columnId}}
In most cases, you can replace the utilities.httpcall part of an HTTP module data reference with call_api.make_api_call/response to update the mapping.
Use the Call API tool across your solutions
- Profiles apply to the workspace, so all workflows in your workspace can use the same Profile in any Make API Call modules used. When Profile details need to change because a user’s permissions have changed or the system API makes changes, there’s a single place to make those adjustments and have them apply to workflows in the workspace using that Profile.
- After completing these steps, you must only follow the Make API Call module setup portion of this guide for additional HTTP Call modules in other workflows using the same profile.
- Following the first part of the guide, you can set up a new, unique profile for each additional system API you need to connect to.