Applies to
Capabilities
Who can use this capability
Resourcing Administrators and Portfolio Editors can create phases for projects.
Use phases for projects
Phases are a flexible way to break a project into different kinds of work.
You can assign people to phases and track analytics on that phase across multiple projects. Each phase can have its own duration, budget, and bill rate. Phases do not have to be concurrent and have no assumed dependencies.
You can also use phases as a way to create smaller projects within a larger client campaign. This is helpful if you provide ongoing maintenance for clients, or work on projects that are only a few days long.
Phases do not sync to the project via the Resource Management integration panel.
To add a phase to the schedule:
- On the Schedule, click on any white space and select Add Phase.
- Choose a phase name from the default options (created in Account Settings) or type in a new phase name
- Go to the project Schedule to adjust phase start and end dates.
To add a phase on the worklist
- On the worklist, select + Phase
- Type in the phase name and then hit Enter.
- Select the new phase and edit its settings in the right pane.
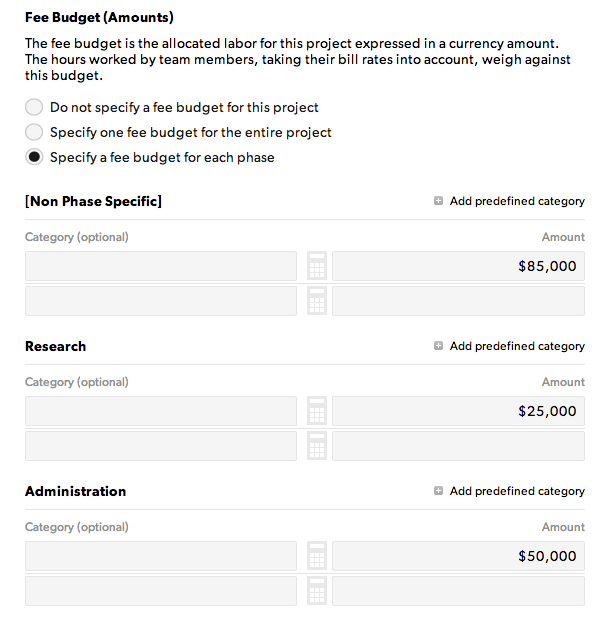
Phase budgets
If your project has phases, you can track a specific budget for each phase. Set this on the project settings page. This option provides you with a table where you can divide the budget across different phases.
The [non-phase specific] budget is allocated to the overall project. Hours recorded or scheduled against the entire project (instead of a specific phase) are tracked in this category.
Phase-specific bill rates
You can set unique bill rates for a phase in phase settings. When you do this, hours tracked to that phase will inherit phase-specific bill rates.
If you use different bill rates for the various project roles, you will want to set up phase-specific rates.