The Smartsheet Salesforce Connector is available as a premium offering. For information about pricing, contact our sales team. If you have the Smartsheet Salesforce Connector purchased on your plan, use the button below to sign in and start creating workflows between Smartsheet and Salesforce.
Sign in to the Smartsheet Salesforce Connector
Get started
Before you create your first workflow between a sheet in Smartsheet and Salesforce, both applications must establish a connection. Ensure that an administrator on your plan has performed the initial connection setup.
Prerequisites
To create workflows in the Smartsheet Salesforce Connector:
- You must be a Smartsheet paid user.
- You must hold Editor permissions or higher on any mapped sheet. You should also have access to the records you'd like to build a workflow to.
- You must have a Salesforce account. You should also be able to sign in to the Salesforce application with the following permissions:
- View Setup and Configuration
- API Enabled. Contact your organization's Salesforce Admin for more details.
- Smartsheet Salesforce Connector must be a premium application available on the plan and the initial connection to the Salesforce environment must have already been established.
- If your System Admin activates the Restrict Users setting in the Salesforce Connector, you must also hold the Smartsheet Salesforce Connector User role. This role is assigned in the Smartsheet Admin Center or the Salesforce Connector interface.
Create a workflow
Once permissions and the initial connection to your Salesforce environment have been established, users can create workflows to sync information between Salesforce and Smartsheet.
With the Smartsheet Salesforce Connector, you can push information in a single direction (from Salesforce to Smartsheet or from Smartsheet to Salesforce) or bi-directionally, instantly updating issues in both applications.
You can sync with an existing sheet or create a new sheet to launch a Smartsheet project using records in Salesforce.
While you're only required to have Editor permissions or higher on the target sheet, it's recommended that you have at least Admin permission levels, as you may need to add new columns to the sheet during the workflow-building process.
Step 1: Start the workflow wizard
- Sign in to the Smartsheet Salesforce Connector.
- Select Add Workflow to start the workflow wizard.
Step 2: Configure the settings
Choose the desired direction for the workflow. Once you've saved the workflow, you can't change it. This determines whether the workflow is manual or automatic.
In Smartsheet, you can't automatically map auto-number columns, system columns, or columns containing formulas using the Salesforce Connector. If you want to sync values from these columns into Salesforce, set up a one-way connection and manually initiate the sync.
- To make any fields bi-directional or syncing between Smartsheet and Salesforce automatic, select Keep issues automatically updated in both Smartsheet and Salesforce. With this setting, you can decide later to make a specific field bi-directional or just a one-way sync.
- Select the sheet you want to sync Salesforce data to or Create a new sheet. You can't change this once you've saved the workflow. Note that you can only create one connector workflow per sheet.
- Select the Salesforce object you want to sync to the sheet. You can't change this once you've saved the workflow.
Select Continue.
Brandfolder Image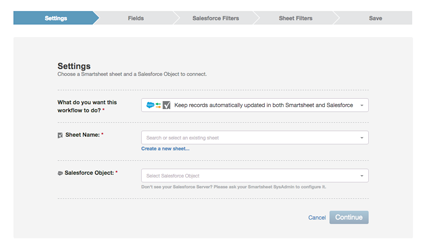
Step 3: Map the fields
Smartsheet maps fields from Salesforce to columns. The Salesforce fields you can choose depend on the fields you've chosen for the workflow in the Salesforce Object. When you configure field mapping, you can decide how the data should flow.
Finish the mappings on this page, remove or add Salesforce fields and Smartsheet columns as needed, and select Continue when done.
Things to consider
- Always specify a Smartsheet column when mapping Salesforce fields. You can't leave the Smartsheet column empty.
- You might only see specific Salesforce fields based on your Salesforce account permissions.
- Ensure you include the Record ID and Error columns as both are automatically added to your field mapping and can only flow from Salesforce to Smartsheet. Smartsheet will introduce a new Record ID and Error columns if you use an existing sheet. However, you have the option to map these to pre-existing columns.
- Always remember that the Record ID is the key identifier for issues in Salesforce. You should align it with the primary column in the sheet to guarantee the correct creation of parent rows and hierarchy. If you remove any of these columns in Smartsheet, the workflow will be interrupted, resulting in an error during the next data sync.
- Remember that the field you're linking will influence the column type if you opt for a New column in Smartsheet during mapping. For instance, a Salesforce date will align with a Smartsheet date column, and you'll see the type displayed in parentheses.
Step 4: Optional filters
Creating filters is an optional but helpful way to control the data synced between Smartsheet and Salesforce. If you would not like to filter down your data, select Continue through the Salesforce filters and Sheet filters pages and skip to Step 5.
You can define filters with either Salesforce filters or sheet filters. When considering which type of filter to use, think if you're only trying to bring certain pieces of information from Salesforce into Smartsheet (for example, always showing issues showing all records associated with a particular customer, which would be a good reason to use Salesforce filters) or if you only want certain lines from Smartsheet to sync with Salesforce (for example, only rows that have a checkbox checked in a specific column, which would be a good reason to use sheet filters.)
Salesforce filters
You can define Salesforce filters by selecting Add filter, which field you'd like to filter by, and defining your filter criteria. All filters added will have an AND relationship.
Sheet filters
Define Sheet filters by selecting Add filter, the Smartsheet columns to filter by, and the filter criteria. All filters added have an AND relationship.
Available filter criteria depend on the columns present in your sheet. If you want to filter options that aren't listed, add the new column to the sheet first.
Step 5: Define row groups (Optional)
As an optional step, you can define row groupings for your Salesforce records by Salesforce fields (for example, Stage) or primary column values in your sheet. To add a row grouping, select Add group and either select the Salesforce field you'd like to group by or list the primary column value you’d like to group by in Add Custom Group.
When you define custom row groups by the primary column of your sheet, you can use an existing value in your Primary column or create a new value to create a new parent row grouping.
If your custom row group isn't placed within the existing hierarchy, the new parent row will appear at the bottom of your sheet.
Notes
- If you've mapped your Record ID field to a column other than the primary column in the sheet, you won't be able to generate new records in Salesforce from Smartsheet with Row grouping on. However, you can still initiate new records in Salesforce and sync them to Smartsheet.
- Issues that lack a grouping value in Salesforce will appear under a hierarchy titled Field '[Group]' not set.
Step 6: Save your workflow
In the Update Summary on the Save page, you'll see the number of fields updated in Salesforce and Smartsheet. If the Update Summary count appears unexpectedly high or low, go back to add or remove filters as needed.
- Label your workflow under Workflow Name once you're satisfied with the Update Summary count. This helps you quickly locate it later on the Salesforce Connector dashboard.
- If you want to convert new rows in Smartsheet to items in Salesforce, check the box next to Sync new rows created in Smartsheet to Salesforce.
- Finally, after all your adjustments, select Save Workflow.
Once you've saved the workflow, you can’t change any of the values on the Settings page, such as the direction of the workflow, the sheet being synced, or the Salesforce Object included in this workflow.
After saving your workflow, you'll land on the dashboard, and your workflow will automatically run and update records based on your workflow configuration settings. A bi-directional sync continues to run automatically unless disabled or deleted. You must manually run the workflow for a one-way sync setup to update.
Edit workflows
You can always edit your created workflow. Smartsheet Salesforce Admins can disable or delete any organizational workflows but not edit.
To edit the workflow, select the gear icon to the left of the workflow name and select any of the following:
- Edit Workflow: Go back to the workflow wizard to make changes to the workflow. You can't change the direction of the workflow, sheet synced, or Salesforce Object included.
- Rename Workflow: Change the workflow name.
- Disable/Enable Workflow: Stop or start the workflow automation.
- Delete Workflow: Delete the workflow entirely. You can't recover deleted workflows.
Filtered out by Connector—not synced
Suppose a sheet row will no longer sync with Salesforce, either due to filter conditions in the workflow or because the record no longer exists in Salesforce. In that case, the row is automatically moved to the Filtered out by Connector—not synced section of your sheet.
Even though a row is no longer synced, it might contain essential column data, attachments, or comments. Because of this, Smartsheet won't delete rows from your sheet. Instead, it creates this Filtered out by Connector—not synced section to retain the information filtered out by the Connector.
You can't turn off the Filtered out by Connector—not synced functionality as it protects against data loss due to accidental workflow or other changes. If you’re sure you don’t need the items listed under the Filtered out by Connector—not synced row, you can delete the rows from your sheet. The rows in question won't be returned to the sheet until they meet the filter criteria set in the Connector workflow.
If you move a row to Filtered out by Connector—not synced and begins to match the filter criteria again, it'll automatically begin syncing again and will be moved from the Filtered out by Connector—not synced section of your sheet to the correct sheet section (based on row groupings, etc.)