You can group your data to combine similar values; this way, rows are organized into logical categories.
USM Content
Reports in Smartsheet pull rows from one or more sheets. By default, those rows display as an undifferentiated list. Grouping organizes rows into logical categories based on shared column values, for example, grouping a cross-project task report by Status so all In Progress tasks appear together, separate from Complete or Not Started tasks.
Grouping is a display-only setting: it changes how results are presented in the report, not the underlying data in the source sheets.
To group rows in a report
You can't use Dropdown (Multi-Select), Contact List, or any column type to select multiple values for groupings.
- In your report, select Group on the toolbar.
- Select the column name you want to group your data by.
- Sort your groups in ascending or descending order.
- Add another group, if necessary. You can add up to three groups per report.
- Optional: Control the default state of the groups when you load or refresh your report.
- Collapse: Hide rows when you load or refresh your report
- Expand: Show rows when you load or refresh your report
- Select OK.
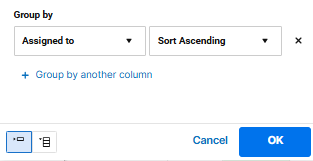
You can group by up to three columns at once (nesting subcategories within categories), select Group by another column and repeat the steps.
Behavior when grouping is applied
- The primary column automatically moves to the far left when you group rows. Right-click the primary column to expand or collapse all groups at once.
- Select the expander arrow next to a group's label to expand/collapse just that group.
- If a report is grouped or sorted by sheet name and the source sheet is renamed, the group header in the report keepa showing the old sheet name until the source sheet is next updated and saved.
- Grouping is a display-only feature. If you print or export the report, the group headers are not included, only the rows appear in the output file.
Edit or remove groups
- On the toolbar, select Group to reopen the grouping panel.
- Locate the group level you want to edit or remove.
- To edit it: Select a different column name for that level, or change its ascending/descending sort order.
To remove it: Select X next to the sort dropdown. - Select OK to apply the update.