Applies to
- Business
- Enterprise
Capabilities
Who can use this capability
- Admin
- Primary Lead
Smartsheet Control Center: Create a blueprint
Blueprints provide the basic structure for the projects and processes that drive your organization. Blueprints save time and effort by automating the creation of new Smartsheet items.
You need a blueprint source folder, and it must contain at least one sheet, report, or dashboard to serve as the source template for your blueprint.
Create a blueprint
- Create your blueprint source folder.
- Select Manage Program > + New Blueprint.
- Use the blueprint wizard to configure the blueprint.
Blueprint basics
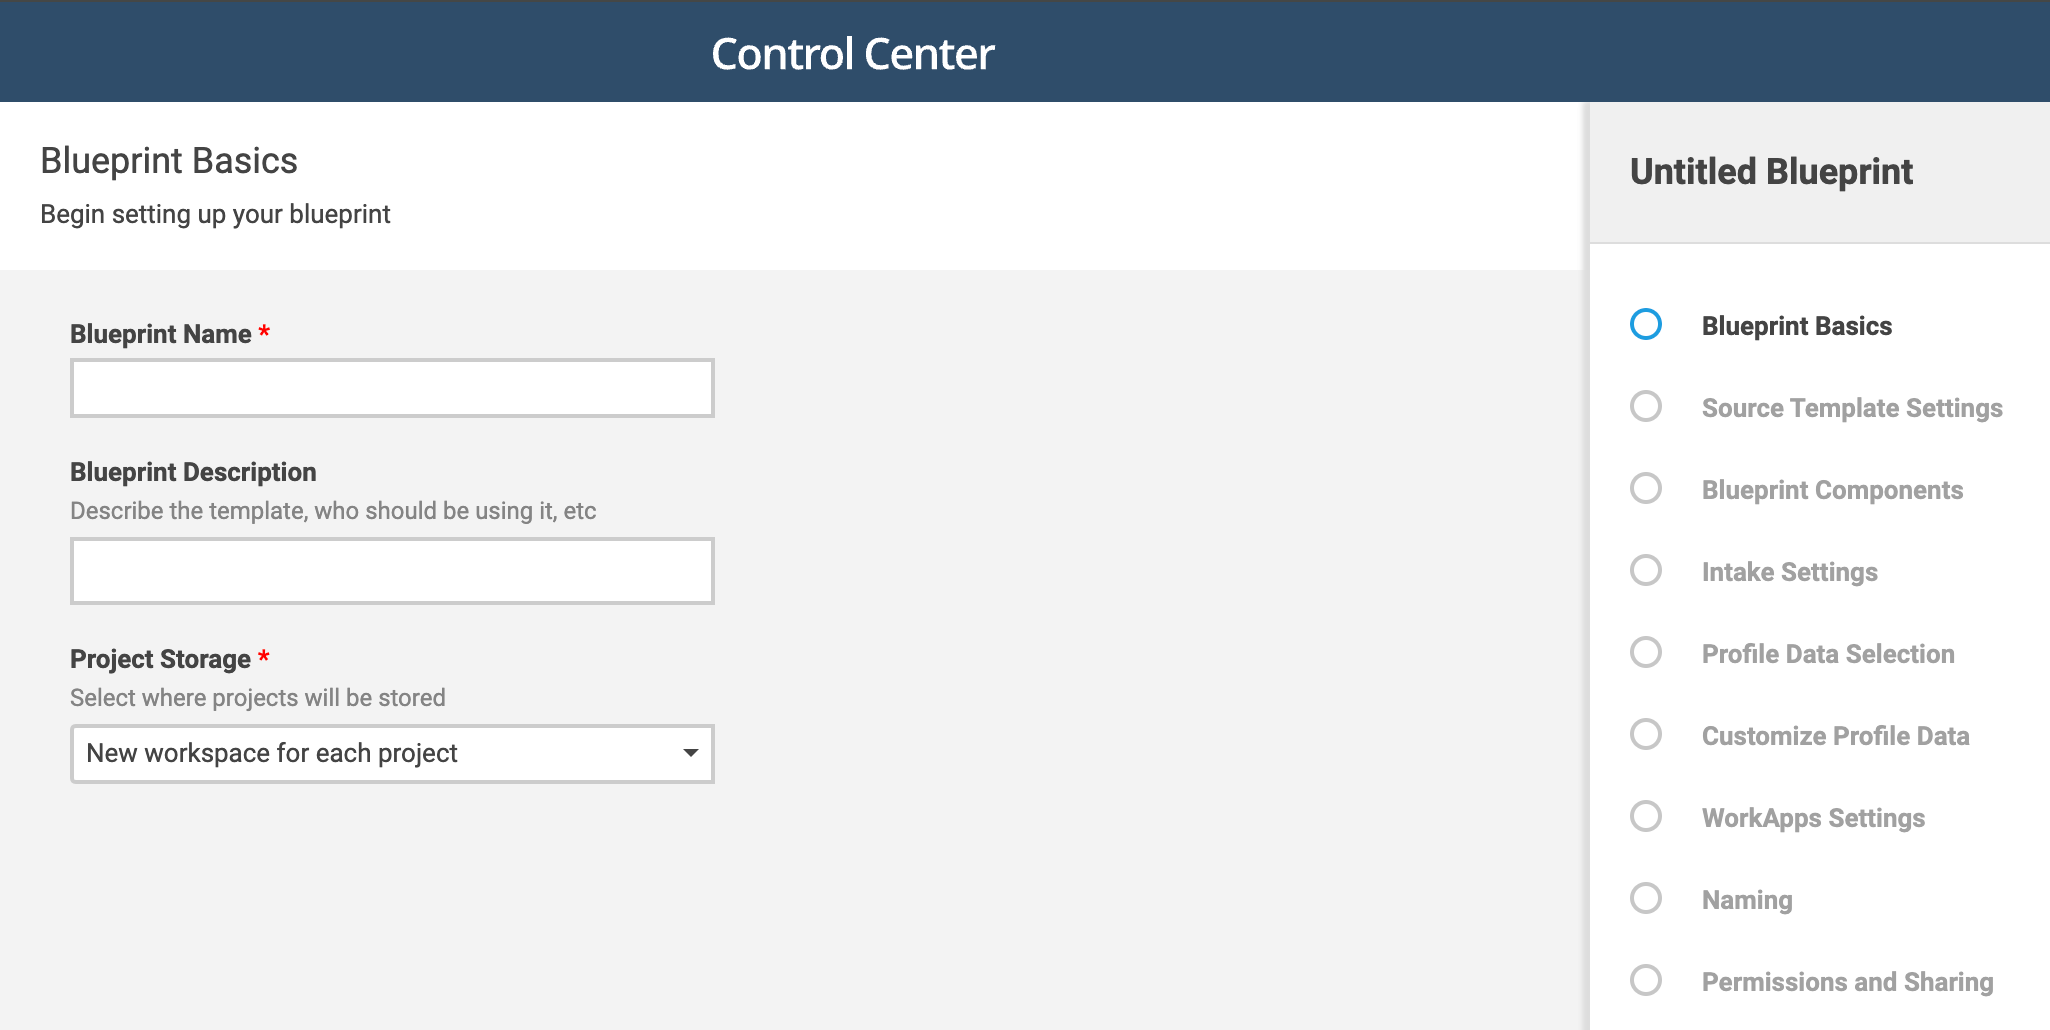
Project storage
When creating a project, where do you want to store the generated items?
- New workspace for each project. Best if you need to change sharing permissions to items for each new project.
- Preselected workspace. You create all new projects in the same workspace. Everyone who can access that workspace has access to both prior and newly created projects.
- Enable users to select workspace. The person creating the project has the ability to choose which workspace it’s created in. Use this to group projects, for example, to group projects by regions.
- Enable users to select or create workspace. The person creating the project can select an existing workspace or create a new workspace for the project.
Source template settings
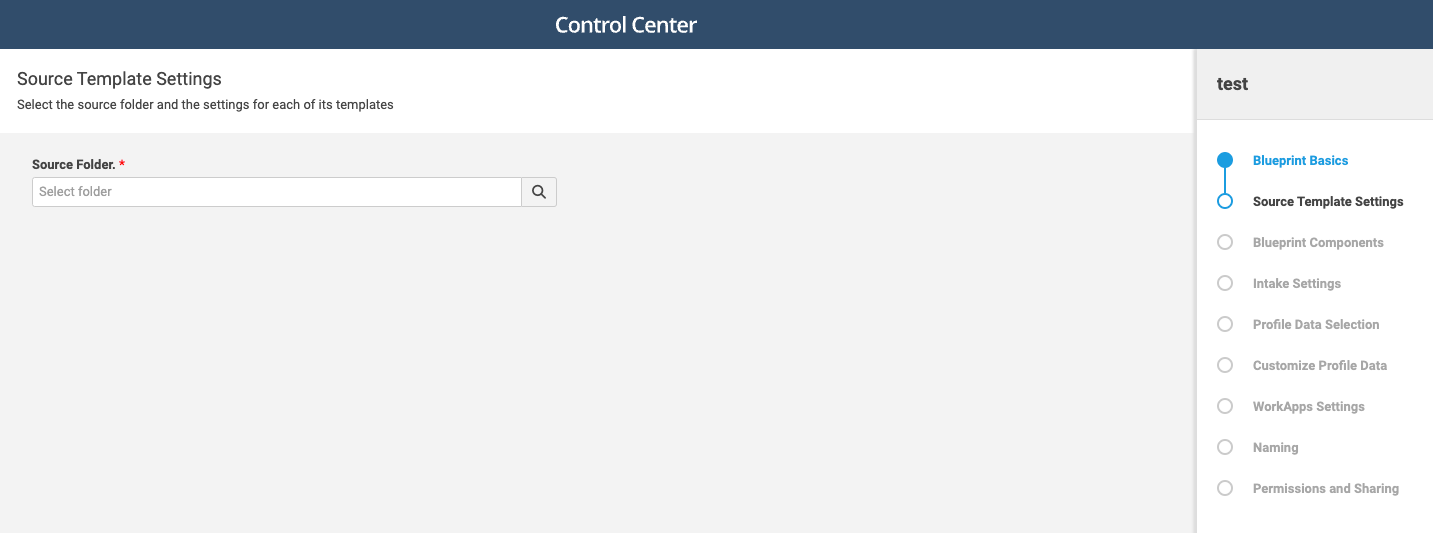
Source folder
A blueprint source folder is a requirement when setting up your program. This screen refers to that folder, and the sheets, reports, and dashboards inside that folder.
Template settings
These settings determine if an item in your blueprint source folder is included in a project, if it’s required, and which sheet launches when you select the project in Control Center. Hover over the row to change which item is your launch sheet.
Optional templates have additional settings:
- Optional - Selected. Uncheck items that you want to exclude from your new project. (All items are checked by default). For example, you might have a Project Governance sheet that’s required for projects over $10,000. Lower budget projects won’t need this optional sheet.
- Optional - Unselected. Check items that you want to exclude from your new project. (All items are unchecked by default). For example, you may have an onboarding sheet for new clients, but a project for an existing client doesn’t need that sheet.
You can’t configure reports as optional. They’re only available as required templates.
Group
If your project uses different versions of the same template, you can group those templates and then select the one you want to use when you create a project. For example, maybe you have two versions of a task list: A fast track and a normal track.
Type a group name (for example, Track) for each template in the group. Set one as selected—the one you use most often— and deselect the rest. You must have at least one selected template in the group as the default optional template.
Advanced Options for each item include:
- Add a Description: Important information to help guide your team on the use of the item.
- Allow Attachments: Grant or restrict the ability for people to attach files to items in the project. For example, if there’s a feasibility study for a project, you can include it when you create that project.
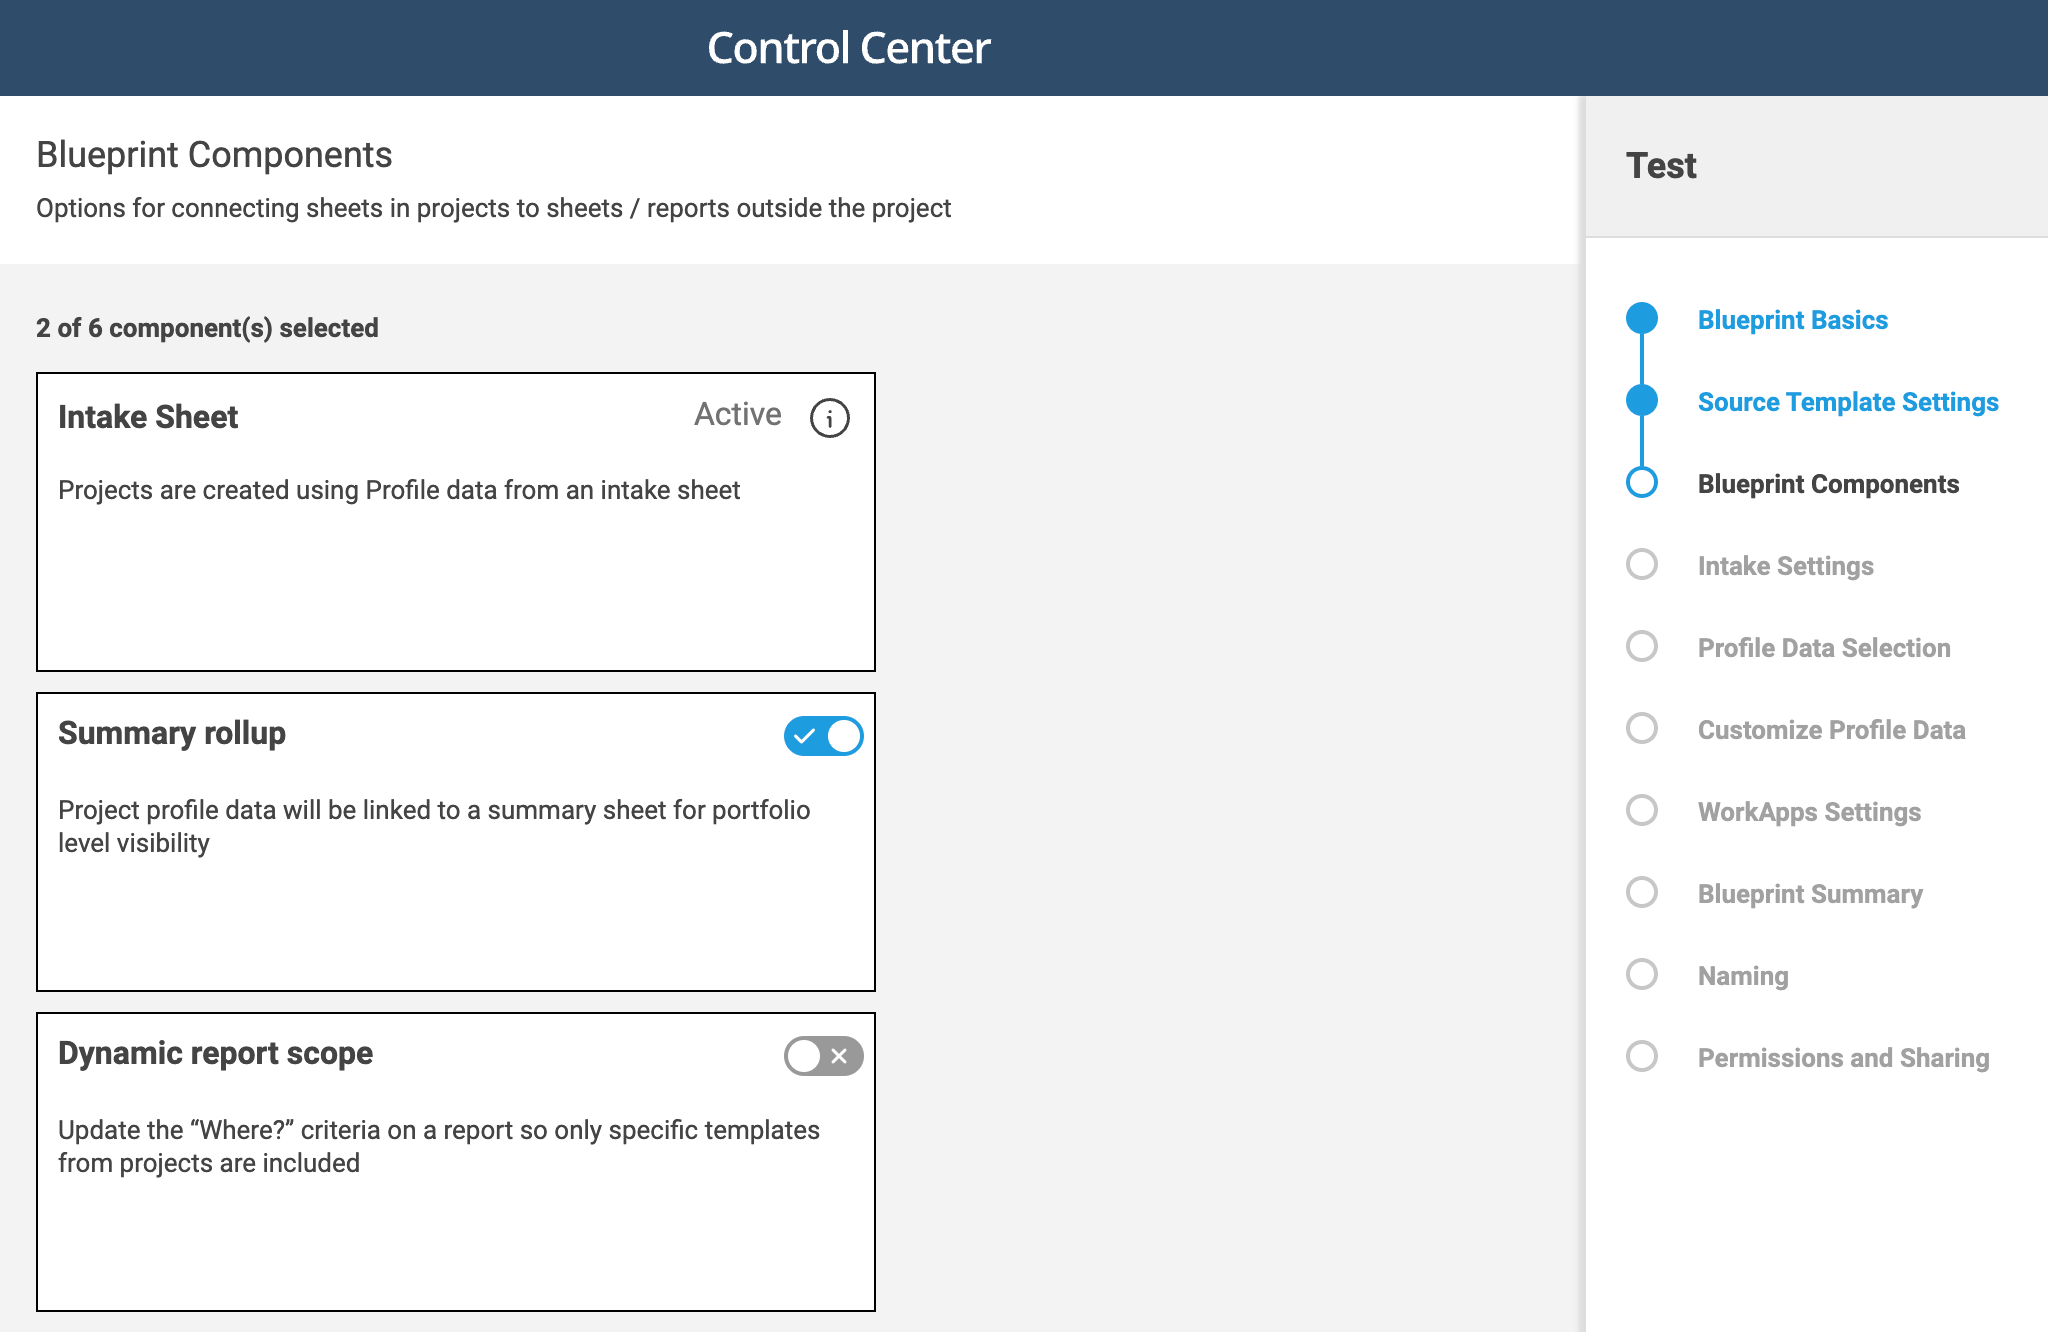
Blueprint components
If your program includes an intake sheet or a summary sheet, you can include those items in your project on the Blueprint Components window. You can enable the following items for all new projects:
- Intake sheet
- Summary rollup
- Dynamic report scope
- Include in WorkApp
Intake settings
Options listed here map to columns in your intake sheet. They tell your blueprint which columns and values to read when you create a new project.
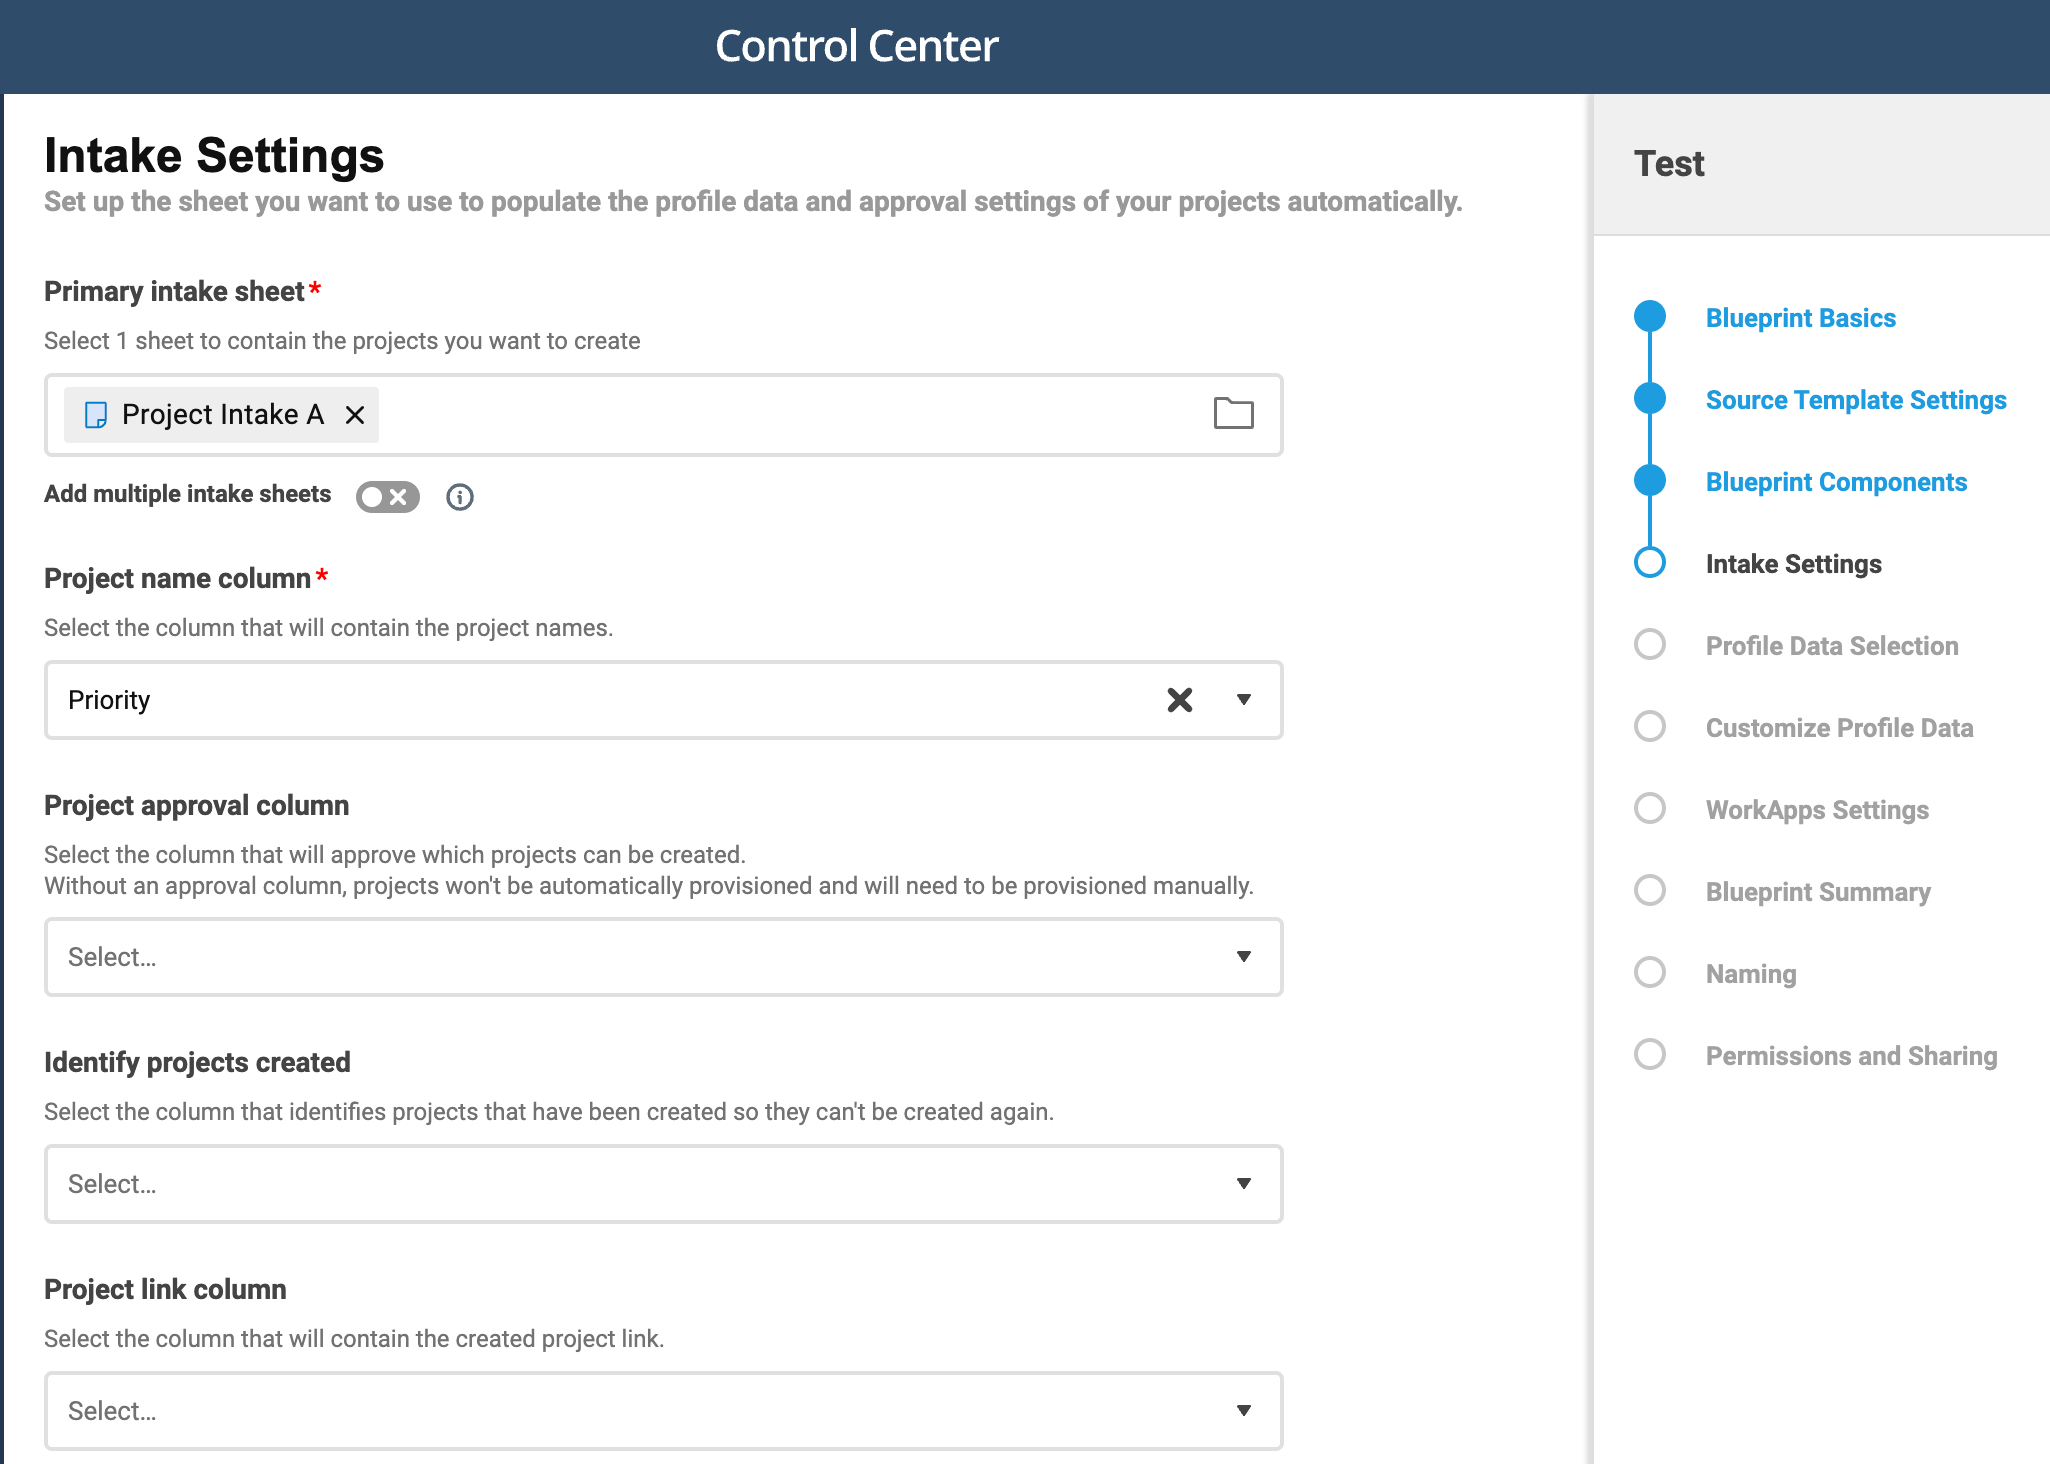
Optional advanced options include:
- Project Link Column: Adds a link to the default project sheet on a selected intake sheet with a direct link to your project after you’ve created it.
- Intake Attachments: If the project row on the intake sheet has attachments, you can select which sheets those attachments should be copied to.
- Additional Filters: Filter on specific columns when you create new projects. For example, you may filter on Department, so only projects in the Facilities Department appear when you select a project. If enabled, the Additional Filters option appears in the Create Project wizard on the Profile Data screen. Whoever is creating a new project can set the filters to change what projects are available in the Select Project dropdown.
Profile Data selection
Elements from the Summary section of your templates are listed here. These items come from your intake sheet. When you select an item here, it’s used as Profile Data when you create a new project. This ensures that your Profile Data is always consistent.
When you create a new project, you provide the information that populates these fields.
Profile Data that appears on both the intake sheet and the blueprint templates is automatically selected.
Customize Profile Data
You can customize where intake Profile Data comes from when you create a project, set up validation rules, and apply other options.

For each field, you can decide where the data comes from.
- Value from intake sheet. Automatically use the value from the matching column in your intake sheet.
- User entered manually. Select the data type to enter when creating a project. There are multiple data types to select from, including date, number, and two types of dropdown lists. If you want to use dynamic dropdown lists, be sure to create a regular dropdown first.
You must select target columns in Profile Data for special data types (Date, Contact(s), Multi-Select Dropdowns, etc). When using dates at intake, you must select the right data type column on the target column to maintain formatting.
Blueprint summary
If you include a blueprint summary, you can configure how to link your project Profile Data to your blueprint summary sheets.
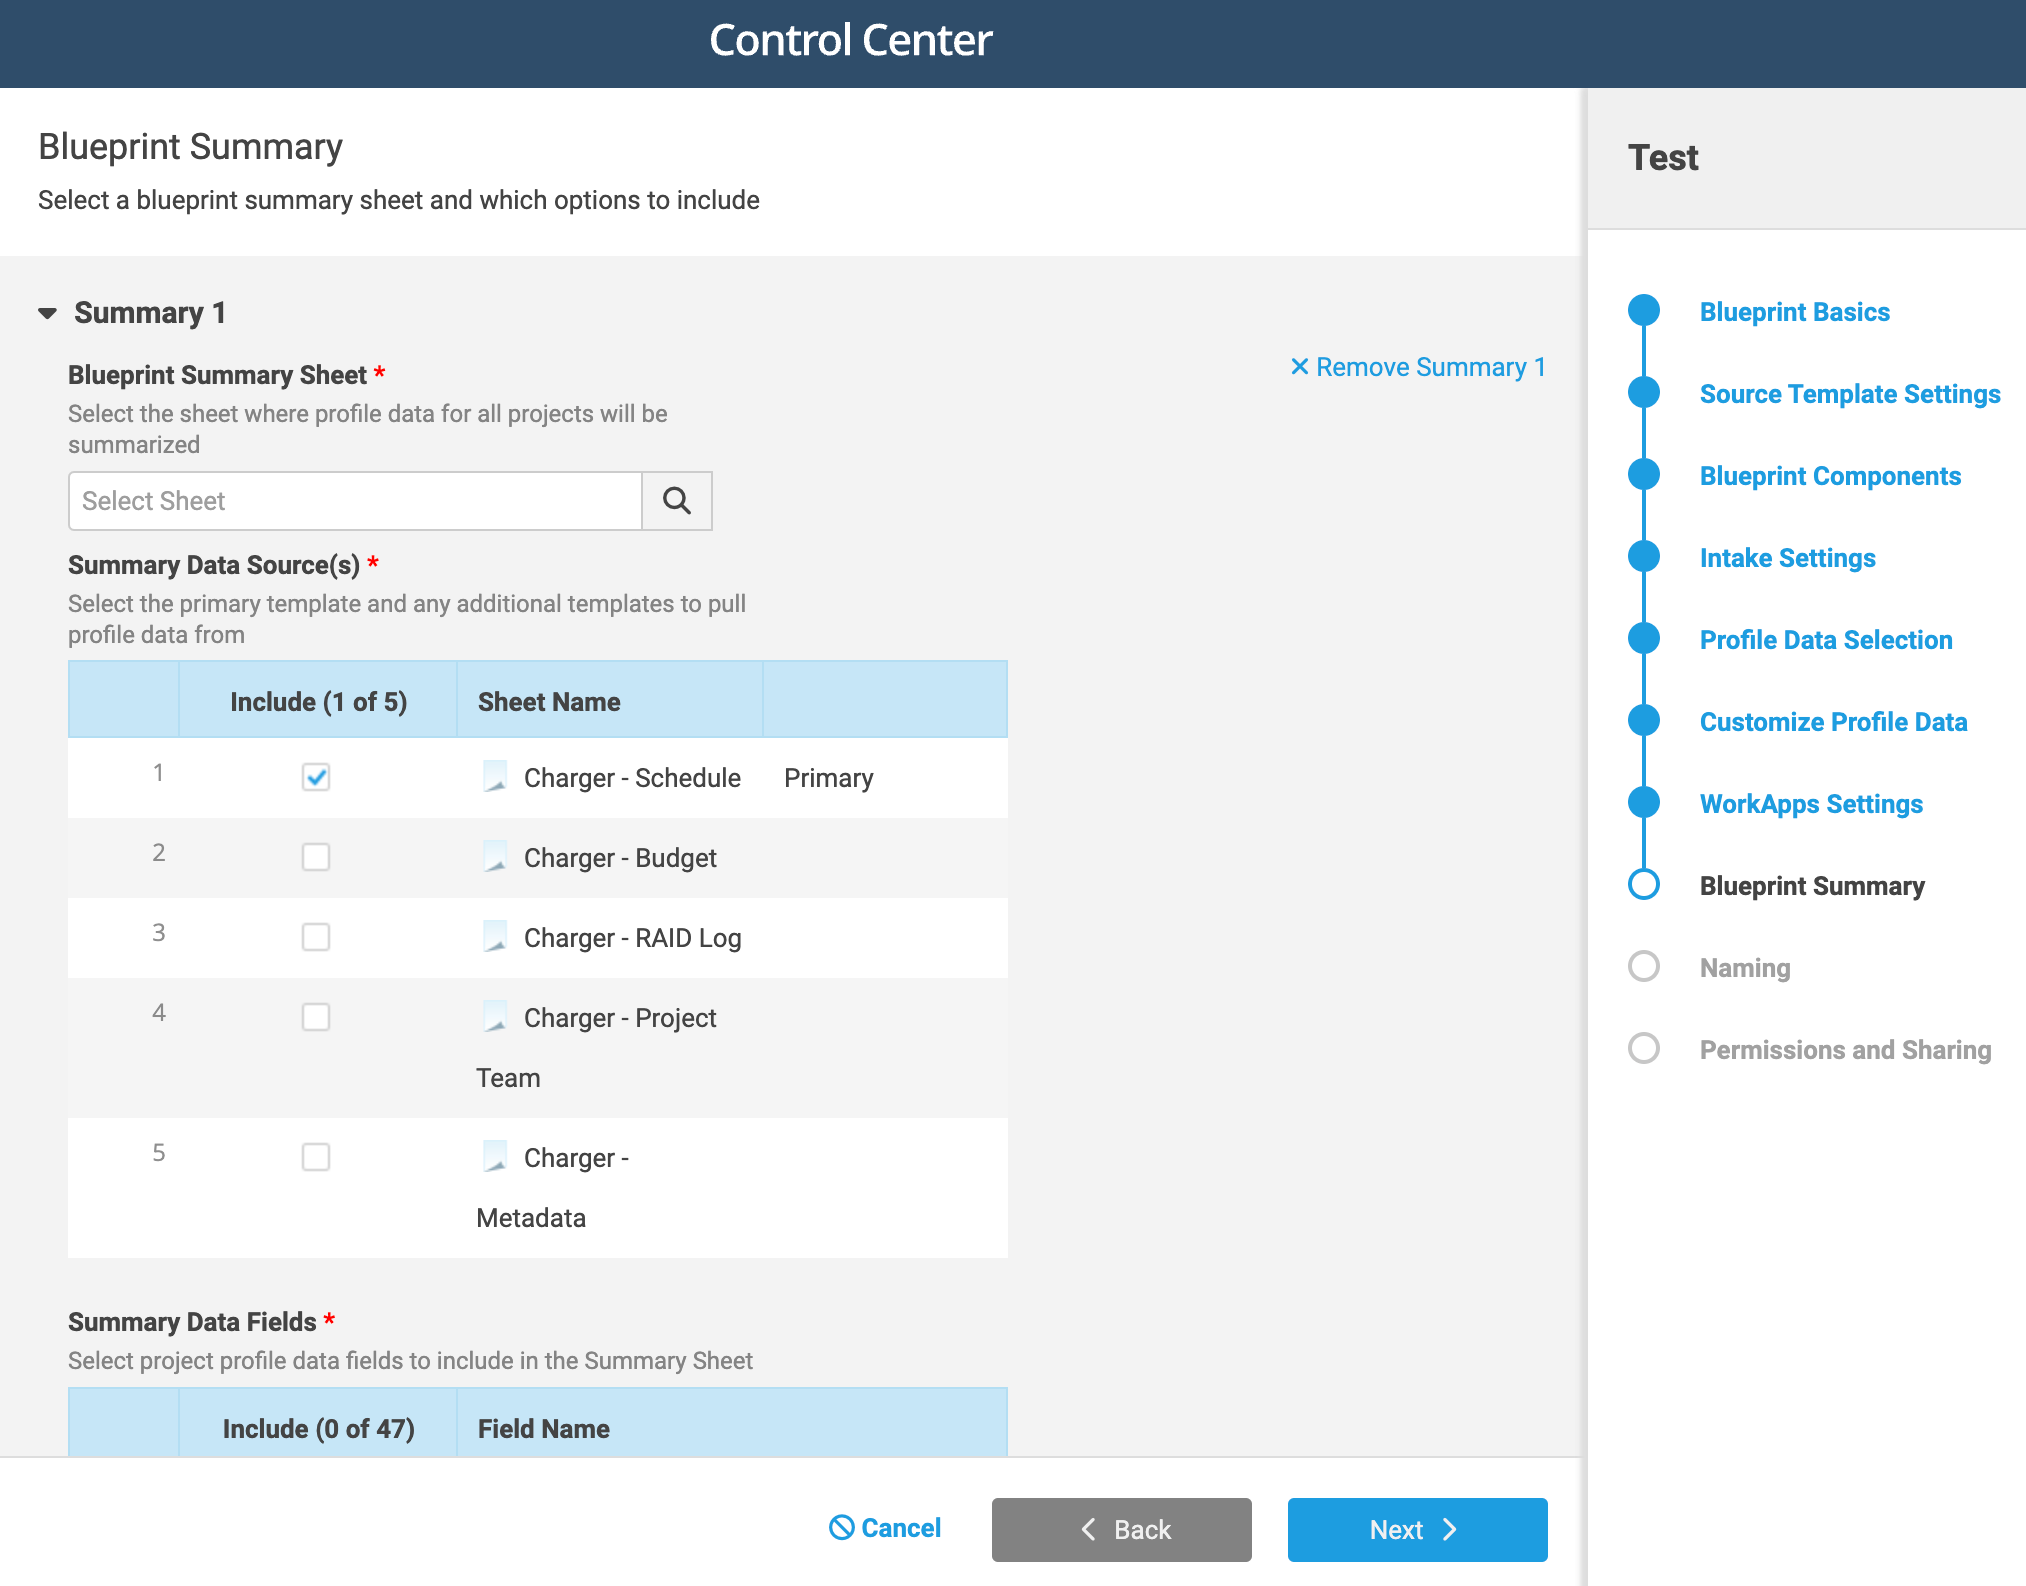
Select the blueprint summary sheet you created when you set up your project.
Summary Data Sources: Select which sheets should have Profile Data linked to the blueprint summary sheet. If you select more than one sheet, choose one as a Primary. The Primary sheet determines which Profile Data has priority in cases where Profile Data exists on more than one sheet.
Summary Data Fields: Profile Data in selected Data Sources that match column names in the blueprint summary sheet are automatically included and required.
You can add additional Profile Data. When you include a data element, Control Center adds a column to the blueprint summary.
To remove a data element, open the blueprint summary sheet and manually delete or rename the column.
Row Hierarchy: Use this to determine how you want new rows inserted into your blueprint summary.
You may specify up to three Profile Data elements—for up to three levels of hierarchy. If no matching parent row is found, the row goes to the end of the sheet.
Leave this blank to add new rows to the end of the blueprint summary sheet.
+New Summary Sheet: Control Center starts with one summary sheet, but you can add more. They’re helpful for:
- Controlling access: One summary sheet can contain financials, accessible to a limited group, while another may contain status information accessible by a wider audience.
- Storing large numbers of projects: Limits apply to how many rows a blueprint summary can hold. Distributing Profile Data across multiple sheets gives you more space.
Project Archiving can free up space on blueprint summary sheets.
Intake summary sheet update
You can link up to 20 profile data fields in your project to the intake sheet. This is useful if a project has few metrics and you want to have them available on the intake sheet.
The intake sheet can only have one sheet linked.
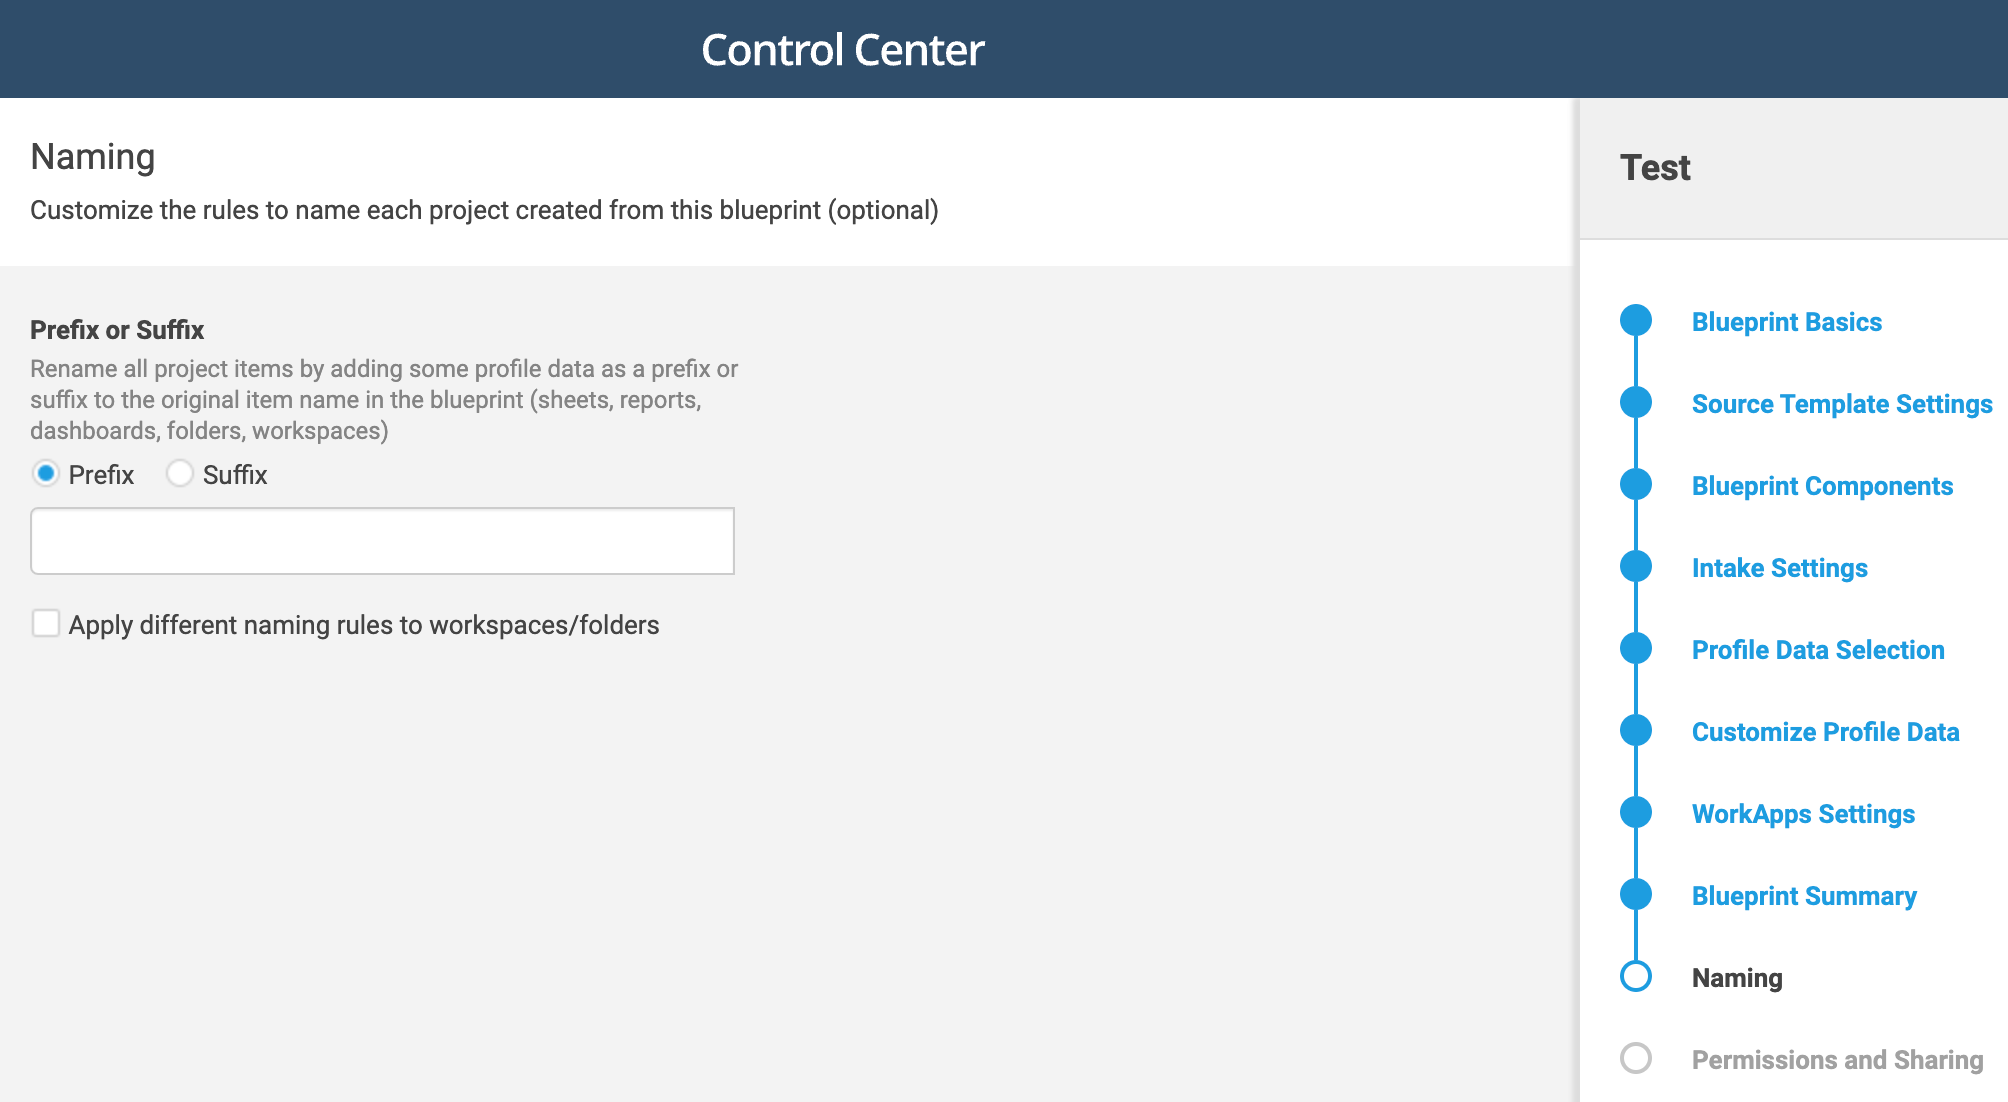
Naming
Use naming rules to help differentiate your projects. Select up to three Profile Elements to append to the name of each sheet in the project.
By default, the project workspace will use these same rules.
Permissions and sharing
These settings determine who—and what level access—each member of your project team has to the projects you create using this blueprint.
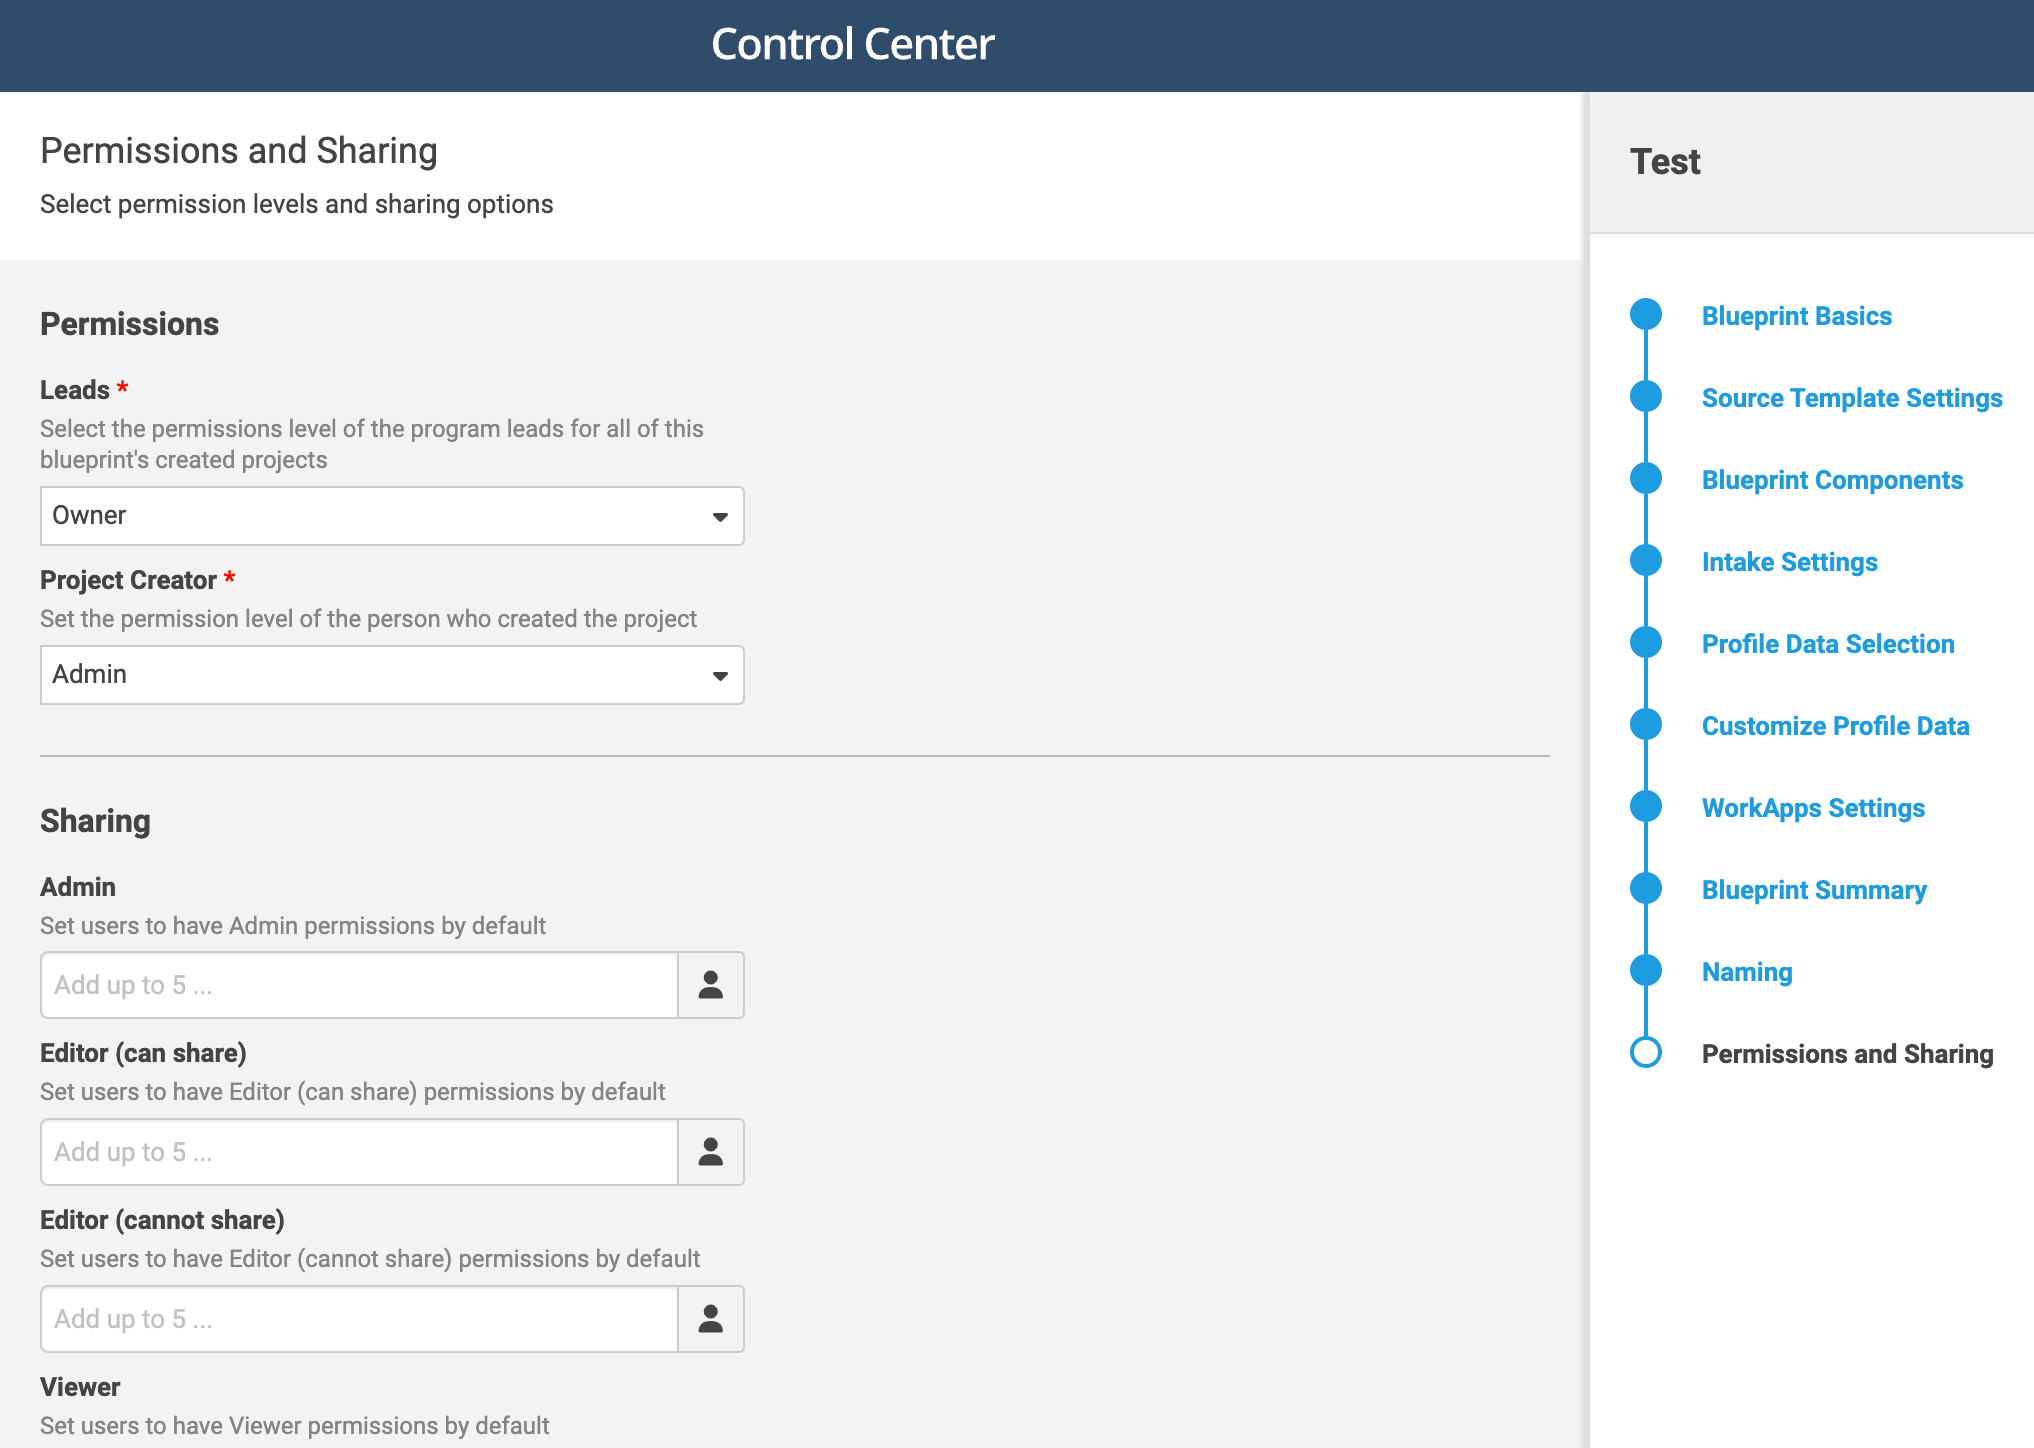
Permissions: Smartsheet items must have a single owner, either the Primary Lead or the Project Creator. Use Primary Lead as the default. Program Leads have Admin permission.
Sharing: Additional users and groups may have different levels of permission on the project. These are in addition to permissions that already exist on the workspace. Users or groups granted permissions in sharing have access to all items in the project.
Users specified in the intake Profile Data can access projects. This is configured as part of the Customize Profile Data screen.
Advanced: Use the Advanced section to share specific templates with a user or group, rather than sharing the entire project.
Select Save in the lower-right corner of the wizard to save your blueprint. You can now create projects with your blueprint, edit, or delete it.