With Smartsheet for iOS, you can take your work with you, collect information from resources in the field, and maintain visibility into key metrics so that you can make smarter decisions on the go.
The Smartsheet for iOS app requires iOS 13 or later.
After installing and launching the iOS app, you can log in to an existing Smartsheet account or start a free 30-day trial.
Smartsheet for iOS: Navigate from the home screen
The Home screen is the landing page from which you’ll navigate to access all of your Smartsheet content. To find the Smartsheet items you need to access, you can use the Search bar, Home, or Browse screens. You can also view and fulfill alerts and requests from your Notifications screen.
Search
You’ll always see the Search bar while on the Home or Browse screen so that you can easily find the Smartsheet items you need.
When you tap the search bar, you can enter your search terms, see items recently opened from search, and filter your search results.
Home
After logging in to the mobile app, you’ll be taken to the Recents tab on the home screen where you can see your last opened items. Tap an item to open it, or tap the menu to see more options and information about an item.
You can also switch to the Favorites tab to see any Smartsheet item you’ve marked as a favorite. Use the Filter by menu at the top of your favorites list to quickly find relevant items.
Your Recents and Favorites are synced to the same recent items and favorites that you see in the desktop app.
Browse
By tapping Browse, you’ll be able to find workspaces and items that you own or are shared to.
In the Workspaces menu, you can tap any workspace to open it, or you can tap the menu icon to mark it as a favorite or share it if you have Editor - Can Share permissions or higher.
In the Sheets menu, you’ll see any Smartsheet items and folders you have access to which are not in a workspace. This corresponds to the Sheets folder in the desktop app.
Notifications
Stay up to date on relevant alerts and requests on the Notifications screen. You can switch to the Requests tab to see Approval Requests and Update Requests, or you can Clear All notifications. See Smartsheet Mobile App: Stay on top of work with notifications and requests for more information about the Notifications screen.
Smartsheet for iOS: Work with sheets and reports
With the Smartsheet for iOS app, you can view and modify data in your accessible sheets and reports even when you’re away from your computer.
The mobile app is best used with sheets and reports that have already been configured. If you need to make administrative changes, such as setting up your report or building automation and formulas in your sheets, then use the desktop app.
Actions in the sheet menu
Tap the menu icon at the top-right corner of your sheet to see a number of options.
Tap this option |
To do this |
---|---|
Favorite |
Add the sheet to your Favorites list |
Sort |
Sort the rows in the sheet for all collaborators according to criteria you specify. Note that you cannot undo this action if your sheet is not currently sorted or if rows have been manually organized. |
All Attachments |
See all attachments on the sheet. You can also upload new attachments or view and download existing attachments to your device. |
All Conversations |
See all conversations and comments in the sheet, including comments at the sheet-level and row-specific conversations. |
All Proofs |
See all proofs on the sheet if proofing is enabled. Depending on your sharing permissions, you can view existing proofs and approve or reject proofs that are awaiting feedback. |
Share |
See all collaborators shared to the sheet. If you have Editor - Can Share permissions or higher, optionally share the sheet with additional collaborators. |
Send |
Send a link to the sheet to somebody as an email. |
Edit Columns |
If you are a licensed user with Admin or Owner permissions on the sheet, you can add, edit, or delete columns. |
Add Row |
If you have Editor permissions or higher on the sheet, you can add a new row to the bottom of the sheet |
Help |
Quickly navigate to our Help articles, Help videos, or Community forum. |
Switch views to change how you see your work
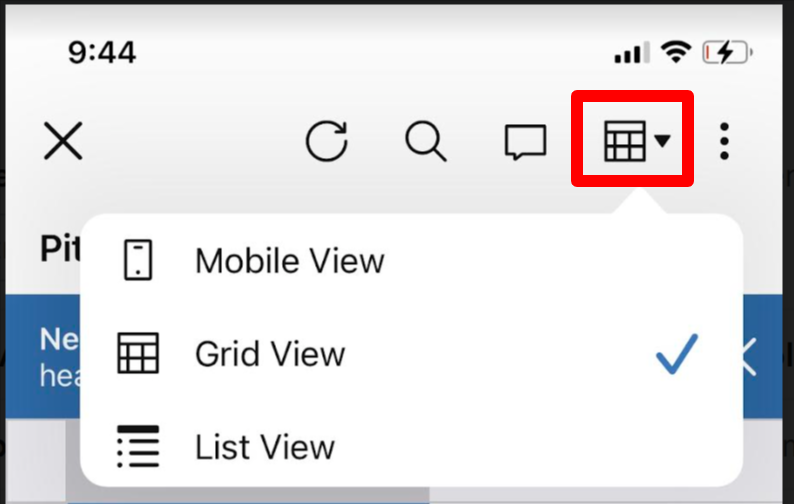
In a sheet or report, there are several views that you can use to fit your needs as you work in the mobile app. To switch views, tap the Views menu at the top-right of the sheet.
In reports, only Grid View, List View, and Calendar Views are available
View name |
Description |
---|---|
Mobile View |
Displays information from fields you specify so you can quickly access and edit key information. |
Grid View |
Displays all rows and columns for a complete view of the sheet. |
Card View |
Displays data in cards organized in lanes. |
List View |
Displays information from the Primary column, best for when you want to quickly navigate the sheet. |
Gantt View |
Organizes tasks as bars in a Gantt chart. This view is only available if there are at least two date columns in the sheet. |
Calendar View |
Displays tasks that are date driven as events in a week or month calendar. This view is only available if there is at least one date column in the sheet. |
Mobile View: Optimize how you see information
In Mobile View, you can specify up to nine key fields, in addition to the primary column, to ensure that you can quickly view and edit key information. You’ll also be able to easily navigate to the Conversations, Attachments, and Proofs for a given row.
Select Fields to Display to choose which fields are displayed and the order that they appear in the expanded view. Tap any field to edit it.
When you switch to Compact View, only the primary column will be displayed so that it is easier to scroll through all of your tasks. You can select Edit Entry from the menu to view and edit all fields on the row.
When in Mobile View, child rows are indicated by a return symbol and the parent row is referenced in smaller, grey text at the top of the entry.
Only the immediate parent will be displayed at the top of the child entry. If you want to see the full ancestry, switch to Grid View or tap each parent name to open the individual cards in the ancestry.
Grid and Gantt View: Take more actions on the row, column, or cell level
Tapping a specific element (for example: a row number, a column header, or a cell) displays an appropriate toolbar for you to take actions.
Tap a row number for access to the toolbar.
Some of the options in this toolbar include, but aren’t limited to:
- Edit content row-by-row using the Edit Row screen
- Leave and view comments
- Send update requests
- Indent or outdent the row
- Lock or unlock the row
- Delete the row
Tap a column header for access to the toolbar.
Some of the options in this toolbar include, but aren’t limited to:
- Edit column properties (column name, type, and description)
- Hide the column
NOTE: To unhide the column, tap the hidden column indicator (black line between two columns), then tap Unhide. - Lock or unlock the column
- Apply a permanent sort
You'll also have access to the cell toolbar whenever a cell is selected.
If the toolbar is collapsed, you can expand it by swiping upward from it.
Some of the options in this toolbar include, but aren’t limited to:
- Edit content row-by-row using the Edit Row screen
- Copy and paste cell data
- View Cell History
- Insert an image, barcode, location, or hyperlink in the cell
Double-tap a cell to edit it's contents.
If there are multiple lines in the cell, use the Edit Row screen or tap a different cell and re-select the target cell.
Tap-and-Drag to Move Rows
While in Grid View, you can tap-and-drag from the row number on the left of a sheet to move the row.
Take a Pictures or Attach Files to a Sheet or Row
You can take a picture or attach existing files to the sheet itself, on specific rows, or through form submissions. To attach files at the sheet level:
- Open the sheet
- At the top right, select the Sheet Menu icon
- Select All attachments from the sheet menu to see all attachments on the sheet
- Tap the paperclip icon and select Attach a File or Choose from Photos to open the file picker and choose the files you wish to attach.
To attach files to a row in Grid view:
- Select your desired row number
- Select Row Attachments
- Tap the paperclip icon and select Attach a File or Choose from Photos to open the file picker and choose the files you wish to attach.
You can also attach files to form submissions by tapping the Upload button if the form includes a File Upload field.
Files can also be attached in Card, Calendar, and List view by selecting the card, event, or list item to expose the paperclip icon.
If you’re uploading images or taking a photo, you can also edit and markup these images during the file upload process.
See Smartsheet for iOS: Capture information from the field for more information about this.
Review and take action on proofing requests
If proofing is enabled on your sheet, you can view, comment, and annotate your proofs directly within the sheet. You can also respond to proofing requests from the Notification Center.
If you need to create a new proof, manage an existing proof, or send a proofing request, then use the desktop app. See Use Proofing to Collaborate on Content for more information.
Collaborate on work items with conversations
While viewing a row, task, or card, tap on the Conversations icon to see the conversations on your selected task. You can also use @mentions to tag collaborators and notify them about your comment. For more information, see Have Targeted Conversations With Comments.
Smartsheet Mobile App: Dashboards
With the Smartsheet Mobile App, you can review the dashboards that you’ve already set up so that you can see key metrics and information on the go. Tap the layout icon at the bottom right corner to switch between Mobile and Desktop Layout.
If you need to modify the content and layout of your dashboard, use the desktop application. See Create or Edit a Smartsheet Dashboard or Portal to get started.