Resource Management for Control Center
Things to know before you start
- Changing column names after you connect Resource Management to Control Center can break your deployment.
- Global Updates are unavailable for the integration between Resource Management and Control Center. To keep both sources synchronized, you need to manually do all updates in Resource Management Project Settings after you provision a project.
- Ensure the Resource Management account you want to use for Control Center is authorized to use Smartsheet. The best practice is to use the same account you use for your Primary Lead in Control Center.
Link Control Center to your Resource Management account
- In Control Center, select Manage Program.
- Select the Integrations tab.
- Select Update.
- Select Allow Control Center.
If you need to change a name or email, or if the organization name appears as not set, you can:
- Open a new browser tab and sign in to your Resource Management account. Sign out of any other Resource Management accounts you might have.
- Select Update.
- Select Allow Control Center.
Link your template sheet to Resource Management
You can only link one template sheet to Resource Management.
- In Smartsheet, open the template sheet you want your resource plans to link to.
- Open the Resource Management panel.
- Then connect the template sheet. You don’t have to connect all your projects, just the sheet.
Use placeholders in your project template sheets rather than specific contacts. Use Smartsheet automation to let resource managers know when you need a specific type of resource.
Review your intake sheet
Resource plans created using Control Center use values from the intake sheet.
Review the intake sheet and ensure the column names match those listed below. These columns map to fields in your resource plan. Use matching column names between Resource Management and your intake sheet to make sure they deliver the same types of data.
- Project name
- Project description
- Start date
- End date
- Project owner (optional, single select)
- Resource Management resource plan URL
- Any optional custom fields you’ve defined in Resource Management
Make sure any required columns have data in them. Required fields with no data in them can cause issues when you provision your project.
You can update the following columns on the intake sheet with information from the Resource Management plan when you provision your projects:
- Resource Management status: This column displays the Project Type from Resource Management (Tentative, Confirmed, Internal)
- Project URL: This column displays the URL to the resource plan. If a resource plan already exists, you can add it to the sheet. If there’s no resource plan, the system generates a new URL for you.
Configure the blueprints
You must configure each blueprint separately to create a resource plan and any associated Smartsheet assets.
- In Control Center, select Manage Programs > Blueprints.
- Select + New Blueprint or an existing blueprint.
- Scroll through the builder to Blueprint Components.
- Turn on the Resource Management panel option, and then select Next.
- On the Resource Plan Settings screen, select the columns on the intake sheet to use with Resource Management.
- Optional: To change intake column mappings, select Edit Settings, save your changes, and select Next. Changes made to the mapping affect any blueprints using the intake sheet.
- On the Connection Settings screen, select which sheet appears in the Resource Management panel after you provision the project. Typically, this is your project plan.
- Complete the blueprint builder as usual.
Create your Resource Management plan
Once everything’s configured, anyone can build a project plan for provisioning.
Add a new project to the intake sheet
You might use a form to do this or add a row in the intake sheet.
- Create a new Resource Management project. Use the same project name, description, start date, and end date you entered in the intake sheet. Build your plan as usual.
- On the project page in Resource Management, select the URL in the address bar and copy it to the clipboard.
- Paste the URL in the project plan column in your intake sheet.
- When you provision the project, Smartsheet automatically creates all your project assets. Your resource plan connects to the specified project sheet via the Resource Management Panel.
Before you provision your project
If you’re working with estimates rather than defined tasks and resource allocation, create your resource plan before you provision your project. Smartsheet provisions the additional assets and links your existing resource plan to the project sheet. As you change team members or assignments in the Resource Management schedule, updates automatically sync back to the connected sheet.
After you provision your project
If you have defined tasks and timelines in the project schedule sheet, build your plan in Resource Management after you provision your project.
- When you provision the project, Smartsheet automatically creates all your project assets, including the new empty resource plan.
- Open the sheet, review it, and adjust the plan as needed.
- Push the assigned resources to Resource Management using the panel. As you change team members or assignments in the Resource Management schedule, updates automatically sync back to the connected sheet.
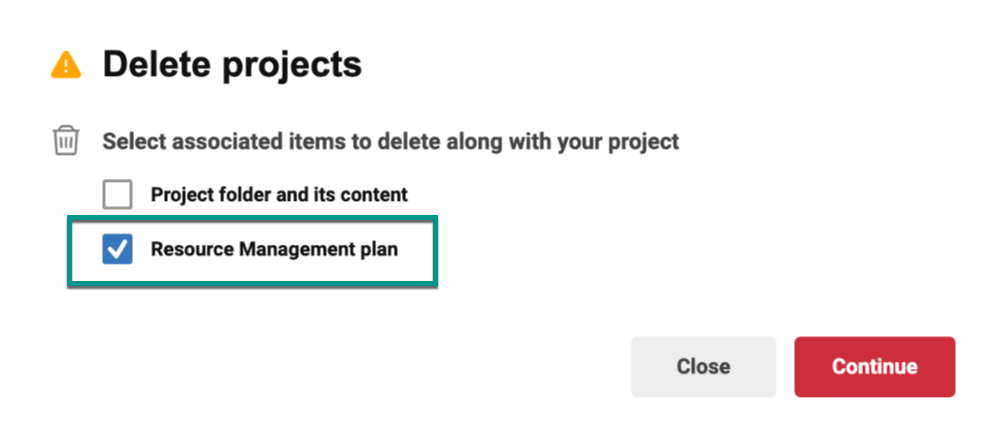
Delete Resource Management plans from Control Center
You can’t recover a Resource Management plan after deleting it.
When you delete a project from Control Center, you can also decide if you want to keep or delete the corresponding Resource Management plan.
Check the box next to the Resource Management plan if you want to delete it, or leave it unchecked to keep it.