In this section, we’ve outlined how to get your account set up with the features listed below. All feature settings are available within account settings.
Add custom fields for people and projects
Custom fields for people can add properties including skills, certifications, managers, and organization structure to profiles. For projects, use custom fields to add business-specific criteria to your projects and specify properties such as Portfolio Editor, project priority, the likelihood of closing, business unit, project IDs, and location.
When you integrate Resource Management with other business tools or systems, add custom fields using the same tags or identifiers used in your other tools.
Projects and people can have multiple custom fields. You can filter those fields on the schedule, project portfolio page, or reports.
Create custom fields
Only Resourcing Admins can add custom fields.
- Select Settings in the top right corner.
- Select Account Settings from the drop-down list.
- Select Project Custom Fields or People Custom Fields from the left navigation menu.
- Select Add, and fill out the following information:
- Field Name: The display name for the custom field and its filters.
- Field Description: Describes how this custom field should be used (optional).
- Field Type: Select Text Field, Drop Down Menu, or Multiple Choice Drop Down Menu. Drop Down Menu, and Multiple Choice Drop Down Menu allows you to specify the options that will appear.
- Default Value: The value that new projects or people will have pre-populated in this field. Select Apply default value to existing projects/people to have this value populate existing assignments.
- How is this field used?: Determine whether you want this value:
- Visible on the project or personal page
- A filter option throughout the account and a display option on people view in the schedule
- Editable only by administrators (people custom fields only)
- Select Save to create your custom field. The new field will appear on all projects or people with the default values if applicable. Resourcing Admins and Portfolio Editors can edit custom fields in the project settings or profile settings, as applicable.
Updates on custom fields
If you update a custom field in Account Settings, the update appears in all projects and people using the field.
If you remove a custom field from Account Settings, the project or person will retain that value within their setting. As long as at least one project or person has that value attached to their settings, the option will still appear in the filtering options on the schedule and in reports.
Filter by custom fields
Filtering a custom field in reports allows you to show specific items in a data set. For example, you can filter on high-priority projects or projects belonging to a particular portfolio editor. You can apply multiple filters. You will only see filters available in the data you have grouped.
Single sign on (SSO) for Resource Management
This article is exclusively for existing Resource Management customers using Resource Management SSO, which is now discontinued for new sign-ups. Now, anyone requiring SSO must use Smartsheet Authentication.
Resource Management provides SSO using the SAML 2.0 protocol, which works with all major providers, including but not limited to ADFS, Azure AD, OKTA, and Google. Resource Management supports the Web Browser SSO profile.
Only SP (Service Provider) Initiated login is supported. IdP initiated sign on is not supported.
Before you begin
First, create or designate an account that will use a username and password (not SSO) to log in.
This account provides you with a backup strategy in the event that changes are made to your SSO configuration and SSO-enabled users are no longer able to log in. The backup account allows you to log in if SSO fails. If you don't have a backup account, you may be unable to log in.
Set up SSO for your account
Migrate your SSO identity provider to https://rm.smartsheet.com.
Make sure an Administrator confirms these changes on the Account Settings > SSO configuration page immediately after you update the identity provider.
- In your SSO identity provider (IdP) set up Resource Management as an app (relying party) using the relevant SSO configuration values from https://rm.smartsheet.com/saml/metadata.
ACS URL: https://rm.smartsheet.com/saml/acs
EntityID (audience): https://rm.smartsheet.com/saml/metadata
NameID: urn:oasis:names:tc:SAML:1.1:nameid-format:emailAddress - Log in to https://rm.smartsheet.com as an administrator. Navigate to https://rm.smartsheet.com/settings and select the SSO section. If SSO has not yet been enabled, select Setup SSO, otherwise, choose Edit.
- Add the URL to your IdP Metadata. Then choose one of the two available configuration modes: automatic or manual.
Automatic Configuration: Enter your IdP supplied metadata URL. IdP supplied metadata provides the Single Sign On URL, the Entity ID and the x.509 certificate file required by Resource Management. Automatic configuration is easier to configure than manual and does not require extracting and uploading a certificate.
The Automatic Configuration SSO mode in Resource Management will dynamically fetch the latest certificates and Sign On URLs when users log in to Resource Management. This mode also supports scenarios where you have multiple certificates associated with your SSO application (i.e. rotating certificates gracefully). Your identity provider must supply a publicly available metadata URL as XML.
Manual Configuration: Enter your SAML 2.0 signing certificate and URLs.
Use this option if your IdP does not supply a publicly available metadata URL, metadata XML is incomplete/malformed, and/or the organization is not in favor of mutable settings.Obtain the x.509 certificate, SSO Sign in target URL, and Logout target URL from your IdP. If you're unsure what URLs are needed, reach out to your IT department or IdP admin for assistance.
Your SAML 2.0 signing certificate must be PEM encoded. DER encoding is not supported.
Brandfolder Image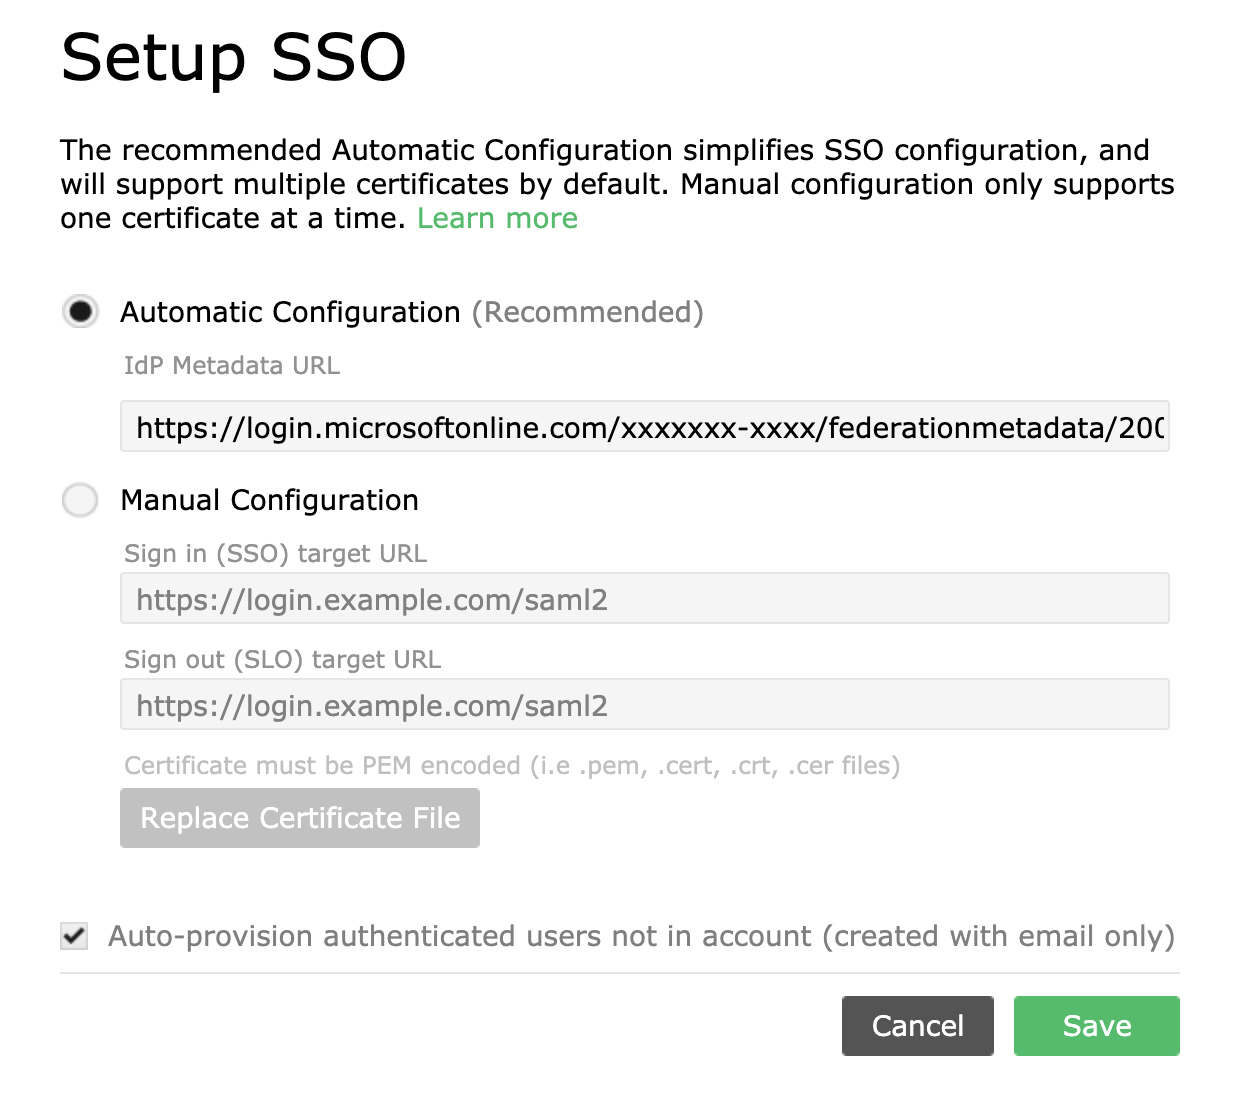
4. Select the Auto-provision authenticated users not in account option to allow users to bypass the invitation process.
When you select this check box, new users do not need to accept an invitation to join the application. They can visit the sign-in page, enter their email address, and they will be recognized as a user in the system with the option to sign into your company account.
This auto-provision check box does not automatically provision new user accounts. New user accounts must be created through the application.
5. Select Save.
Required attributes
For successful sign-in authentication, a NameID claim with the format of an email address must be passed to Resource Management. The required name identifier format supplied by the identity provider is:
urn:oasis:names:tc:SAML:1.1:nameid-format:emailAddress
After setup
Once a user logs in with SSO, they can not log in with a username and password, and their profile email address will be locked in the application. To update their login email, please contact us for assistance.
If your SSO in Resource Management is set to Manual Configuration mode, and you need to make changes to your SSO settings in the application, first enable Automatic Configuration using the steps above. Once SSO is set to Automatic, Resource Management will detect changes to your IdP SSO configuration.
If you use Manual Configuration mode and make changes to your SSO configuration, do so with caution. Before making changes to your active SSO configuration, ensure that you have at least one administrative user who does not log in with SSO and still has a username/password login. This will allow you to log in with that profile should you need to revert any changes.
Once SSO is enabled for your organization, in order to log in with username and password, select the link labeled Sign in using your Resource Management password.
If you are encountering issues, contact support.
Apply custom branding to your account
Custom branding settings
You can customize the branding in Account Settings > Custom Branding.
- Select Choose File to upload a new logo image. Your image must be a valid image file type (PNG or GIF) and less than 1MB in size.
- Use the color pickers to select new background or header text colors.
- Use the drop shadow setting to adjust how text is rendered to make it more legible.
You'll see a preview as you make your changes. When you're finished, select Save.
Remove custom branding
Select Remove Custom Branding to revert to the original Resource Management branding.
All custom branding changes will be lost — you cannot undo this action.
Manage multiple currencies
Resource Management does not currently support multiple currencies.
The currency symbol is a visualization not translated into actual-world value to show the combined aggregate in the reports. The power of pivoting reports depends on being able to roll up all financials into one combined view in one currency. Also, if you share team members between offices, each of their bill rates would need to be translated into the currency that fits the project.
Multiple currency scenario:
- Your client is in the UK. Your contract for that project has a budget of £65000.
- You convert that budget to USD (or any currency) and enter it in Resource Management. Based on a sample exchange rate, the £65000 = $98,000.
- Your bill rates in Resource Management are in USD.
- Each bill rate is determined by cost per team member, overhead, and margin target. The $98,000 project and all bill rates for your project have a 30% margin.
- Your team works on the project for 3 months and completes the expected deliverables for $105,000 worth of time. This is $7,000 more than expected and reduces your profit margin to 27%.
- You need to bill the client in pounds which puts you at the mercy of the exchange rate. Fortunately for you, the value of Sterling went up since you wrote the contract. Now at the end of the project, £65000 = $110,000 USD.
- You end the project with a 31% profit margin for that project.
Other multiple currency options:
- Set up an account for each regional office (with their local currencies) and use the API to pull data from all accounts into one dashboard.
- Don't use the fee budget aspect of projects. Track hours instead and give your team a target that is not related to currency.