When you get assigned to projects, the time + expenses page allows you to track actuals that impact the project budget. You can track time against projects you’re scheduled on or expenses (non-labor related costs). We also have a mobile site optimized for time tracking.
Use the timesheet
Your Resourcing Administrator sets how you track time in Resource Management; you'll use one of the following ways:
- 1/2 day tracking: Designed for teams with little variation in daily activities. Tracks time in 4-hour increments.
- Hours + minutes tracking: Allows teams to confirm hours for the week or modify hours to show actual time worked.
- Itemized time tracking: Captures the most detail. Track time against categories and add notes to entries.
Resource Management suggests scheduled hours, but you should record your actual time, even when these hours differ from the plan. Tracking time accurately improves future project estimation.
1/2 Day and Hours + Minutes Tracking
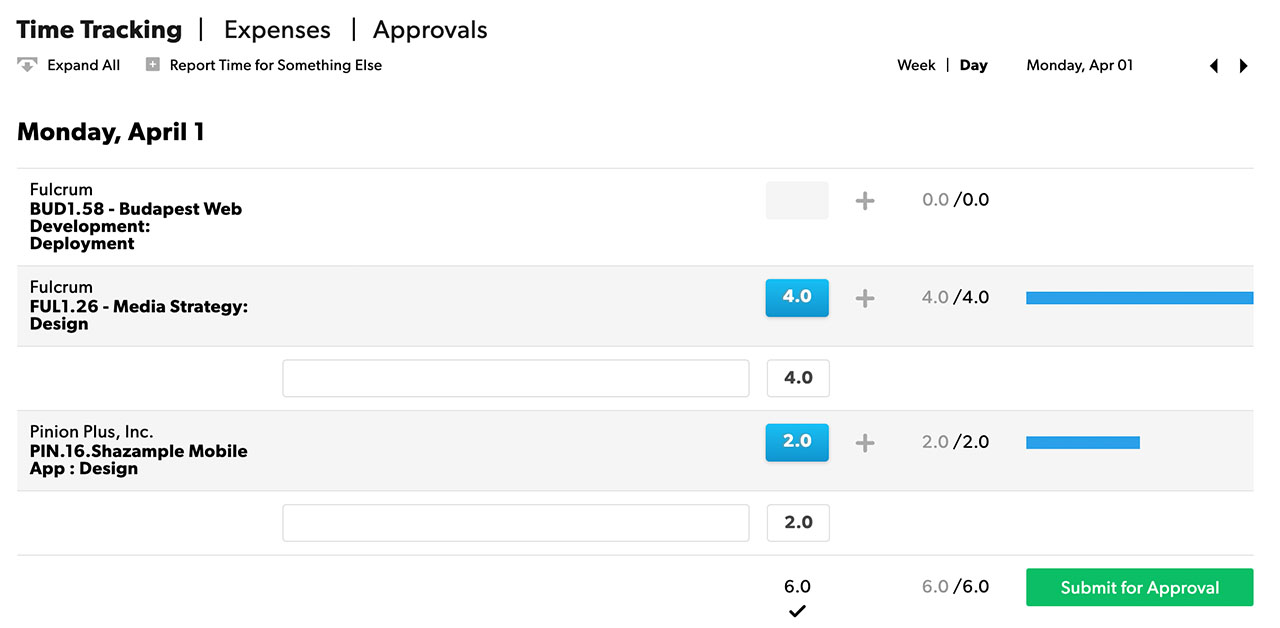
To confirm time:
- Go to your Personal Page.
- Make sure the hours are correct. Enter any changes as needed.
- Select Confirm.
You can make changes to a time entry until a Portfolio Editor or Resourcing Admin locks the hours.
- To change suggested hours, select the time entry and enter your changes.
You might have assigned time entries for more than one project in a day. When you make changes to one of your assignments, Resource Management will assume the other suggested time entries are correct. You can edit or remove these time entries separately.
- To report time for something not on the timesheet, select Report Time for Something Else, select the appropriate project, and add your hours.
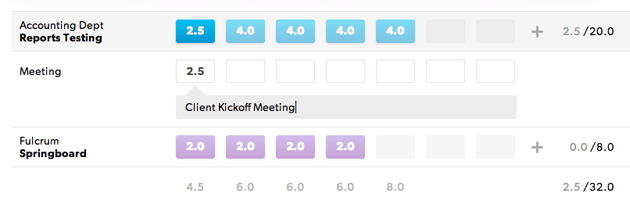
Itemized time tracking
With itemized time tracking, you can assign categories and add notes to each entry. Categories and notes help your team understand how you spend your time. Ask your resourcing admin if you don't see the categories you need.
Enter itemized time:
- Select the plus icon (+) on the project bar.
- From the dropdown, select a category or add a new one.
- Enter your time for each day and add any notes. Or, at the bottom of the timesheet select the scheduled hours to confirm them.
- Select the project row to show or hide categories for each project row.
Add notes:
Press the down arrow on your keyboard to go to the notes field.
To add multiple notes to one category on the same day, switch to day view. If a time entry that has more than one category row associated with it, you'll be prompted to switch to day view.
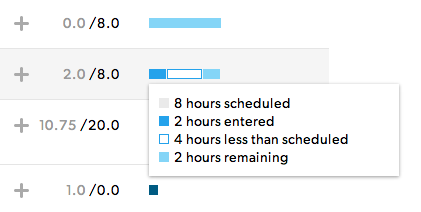
Understand budgets
In week view, hover over a bar to see closely your confirmed hours map to scheduled hours.
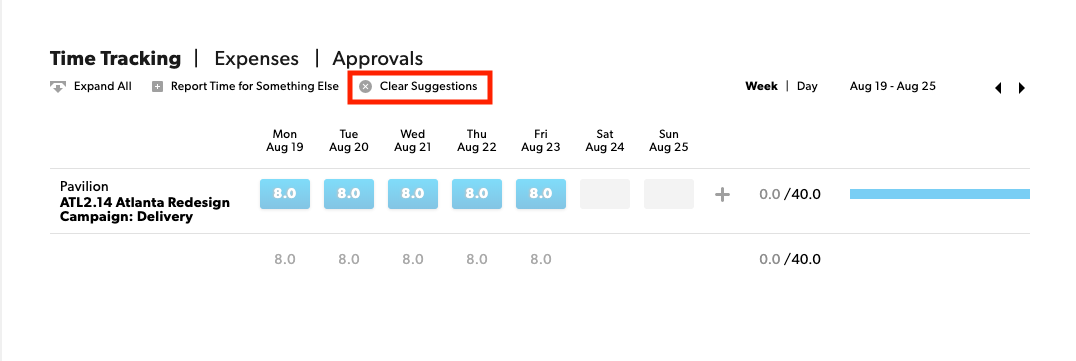
Clear or restore suggestions
Select Clear Suggestions at the top of the timesheet to clear all suggested hours. Select Restore Suggestions to restore them.
Delete a row
Use the trash can icon to remove rows from your timesheet.
If you track time in 1/2 days or hours + minutes, removing a row with the suggested time will clear the suggestions for each time entry in that row. You cannot remove project rows for projects or phrases that you’re assigned to.
Modify locked time
To unlock the timesheet, contact a Resourcing Admin or Portfolio Editor to understand when time entries become locked.
Confirm time for other people
Resourcing Admins and Portfolio Editors can enter and confirm time on behalf of all Licensed Users. Timesheets for Managed Resources are read-only, regardless of permission level.
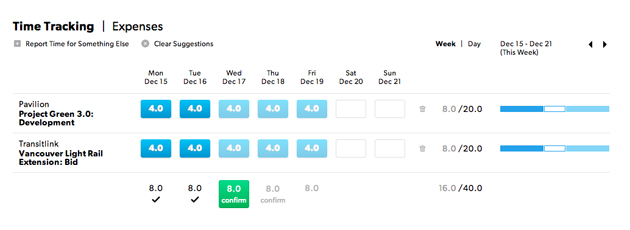
Track time on day view
To track your activities for a specific day, click Day in the upper-right corner of your timesheet.
Track time for multiple categories
If your account uses itemized time tracking, day view allows you to track time for multiple categories on one project.
- On the day view, select the + icon next to your suggested time.
- Select a pre-defined project or time category. If your account does not have categories, select + Add a new blank row to add multiple notes for that day's project(s).
You can also select Report Time for Something Else to account for time worked outside of your assigned project(s).
Use the timer
If your account uses hours + minutes or itemized time tracking, you can use a timer to record your daily activities. You can start the timer for today, and you can only have one timer running at a time.
To start the timer:
- Go to day view on your timesheet.
- Hover over the row beneath the project or phase you want to work on and select Start Timer. The spinner icon shows you the timer is on.
- When you're done, you can add time to your timesheet or close the timer without adding the time.
Timer notes:
- If you forget to stop a timer, close the timer and estimate the correct number of hours worked.
- If you forget to stop a timer before starting a new one, the original timer will stop and automatically add the tracked time to the associated project, and the second timer will start.
- You don’t need to keep your browser window open; the timer keeps running. You can work in other browser tabs or minimize the timesheet page while you work.
Track expenses
Expenses are any project costs that aren't labor. You can track both reimbursable and non-reimbursable expenses.
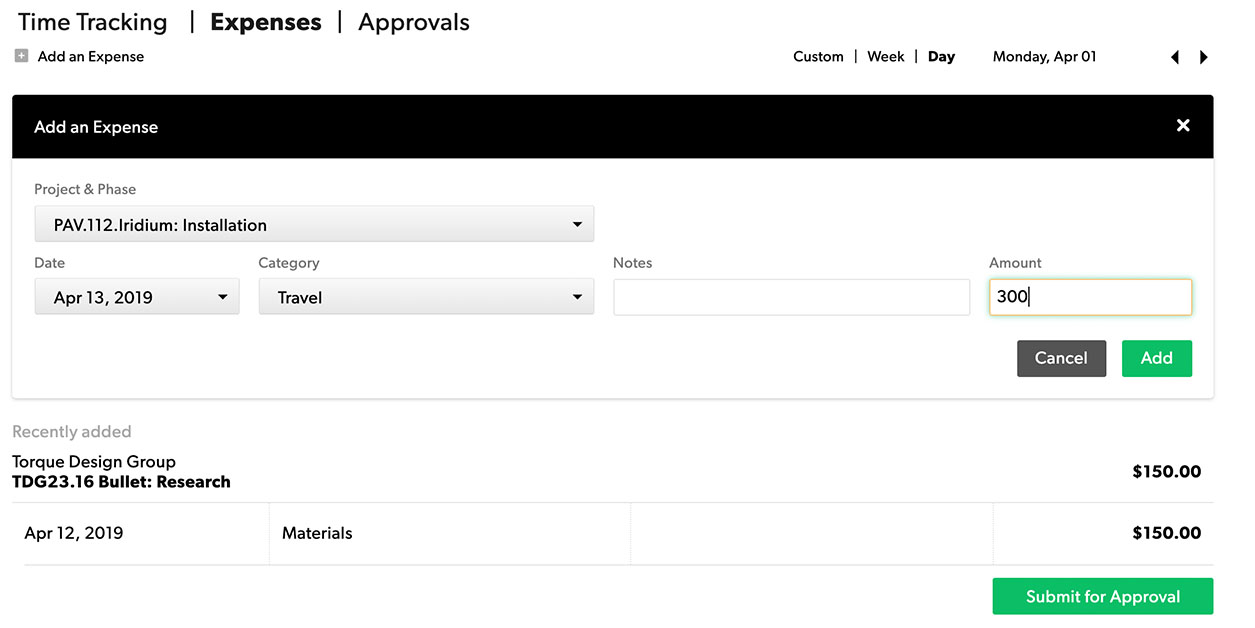
Add expenses
- On your personal page, select Time & Expenses, and then select Expenses.
- Select Add an Expense.
- Fill out the expense form. Include the project, phase, date, and an expense category if there is one.
- Select Submit for Approval, and then select Submit.
Resource Management mobile site
Using the mobile site, you can track your time and set your status while on the go.
You can log time on the go but you cannot submit time for approval on the mobile app.
Launch the site at rm.smartsheet.com.
Track time
The timesheet shows suggestions for today. If you work according to suggestions, tap Confirm at the bottom of the list.
Tap the hours for an entry to change the settings.
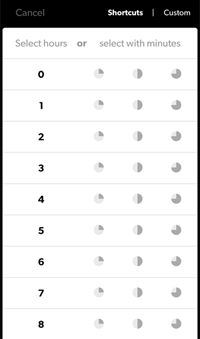
Use shortcuts
The shortcut grid shows a series of single-tap time entries so you don’t have to use the keyboard to enter your time. The column on the left shows whole hours. The other columns allow you to enter additional fractions of an hour, for example, 2.5 hours.
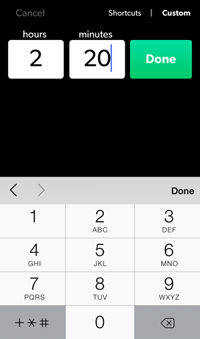
Enter custom time
If the entry you want is not in the shortcut list, tap Custom and enter the exact hours and minutes.
Non-itemized time tracking
To track hours & minutes for each project:
- Tap Report time for something else.
- Select Project and/or Phase.
- Enter time via the shortcut grid.
To delete an entry, set it to 0 hours.
Itemized time tracking
If you use itemized time tracking, select Category and Notes:
- Tap Report time for something else.
- Select Project and/or Phase.
- Select Category.
- Enter time via the shortcut grid.
- Enter optional notes or tap Done.
Tap a project name to add a new itemized entry; you'll go directly to category for that project.
Additional tasks
- To change category, notes, or to delete the entry, tap the left side of the entry.
To enter time for days other than today, scroll the date list.
Change your status, project, and enter notes at the top of the app.
Confirm or adjust time for other people
How to track time for other people
- From your company page, go to the person's profile whose time you want to track. Or, search for the person using the search bar (upper right).
- On the profile page, click Time & Expenses > Time Tracking.
- Enter your changes and then click Submit for Approval.
If you are a Resourcing Administrator or Project Manager in your account and nothing happens when you click on the timesheet, that person is most-likely not a licensed user. If they are a managed resource, you cannot track time on their behalf.
Visit Account Settings > People to see a list of your Licensed Users and Managed Resources.
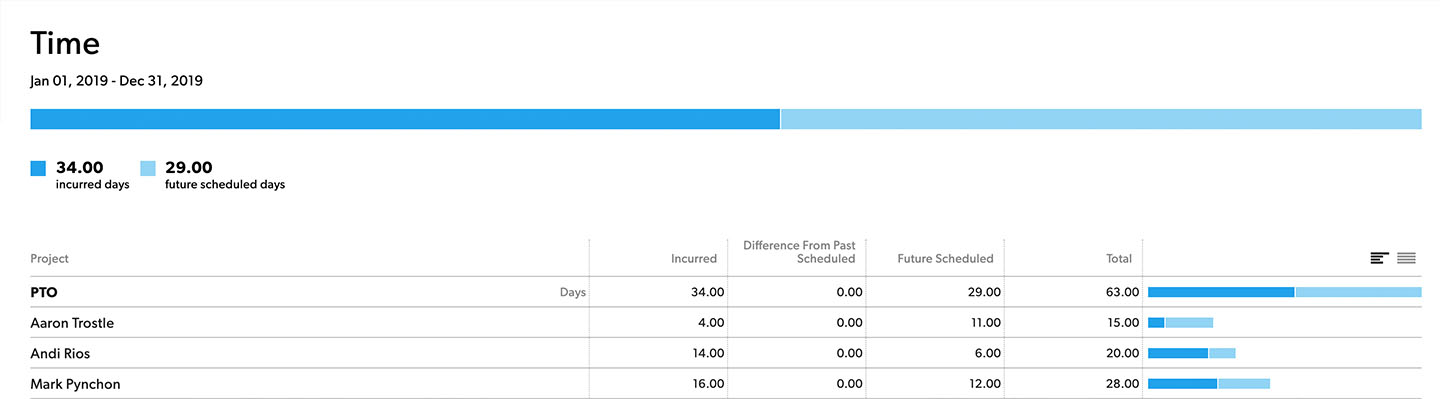
Create a report for incomplete timesheets
Time has different states in Resource Management. Time can be:
- Suggested or unconfirmed: Time scheduled but not submitted; the person has not entered scheduled time into timesheets.
- Confirmed: Time entered into timesheets.
In reports, you can see time in either or both states.
To see a report for people who have not updated their timesheets, review unconfirmed time for the week. To see who has updated their time sheets, review confirmed hours.
Find people who haven't updated their timesheets:
On the top of the screen, click Analytics and use the following settings to create your report.
- View: time and fees (hours)
- Time frame: this week (or whatever duration is desired)
- First group by: team member
- Then group by: project
- Show: time entry type: unconfirmed
Click Save this report so you can access it whenever you need it.
Remove suggested time entries
The suggested time entries help the team understand expectations for how much time they'll spend on their assignments.
Some teams find the plan is different from the actual hours worked. Select Clear Suggestions to start from a blank time card each week.
It is not possible to turn off time suggestions for all users in your account.
Track non-billable time
To track non-billable hours, create a non-billable phase.
To track non-billable time on projects:
- On the Project Schedule or Worklist, create a phase called Non-billable. It should span the duration of the project.
- Click on the phase name on the project Worklist, then select Edit Phase Settings.
- On the Phase Settings page, choose Set different bill rates for this phase.
- Update everyone’s bill rate to $0.
It is possible to make the entire project non-billable using the above steps, but applying the $0 bill rate to the whole project instead of a specific phase.
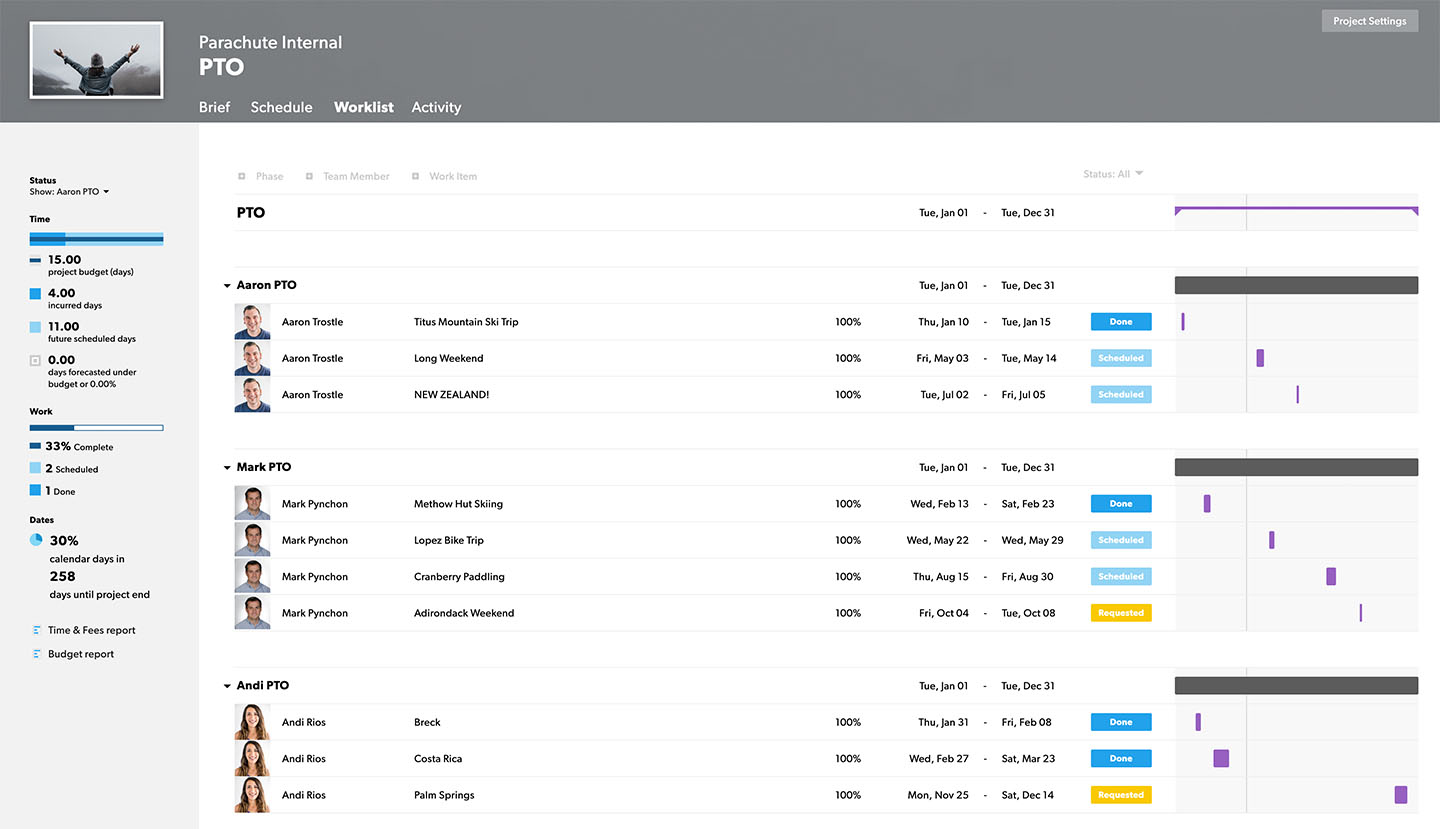
Track time off or leave
To set up an internal project for leave planning:
- Create an internal project to represent the vacation time for the year, for example, "Vacation 2020".
- Set the start and end dates of the project to run for the duration of the year (January 1st to December 31st).
- Create a phase for each person that runs the duration of the year.
- In project settings, set a time budget (in hours or days) per phase to represent each person's allowed vacation time in 2020.
- When a person takes a vacation, assign them to the phase that corresponds with their name on this project.
Now, you can create a time report, grouped by phase name and then by team member, to see the remaining vacation time for each person.