The schedule in Resource Management is a visual way to understand who is working on what and individual responsibilities of your team.
Schedule overview
Use the schedule
On the schedule you can:
- Review project assignments.
- See and update the project status.
- View the Schedule by day, week, or month.
- Adjust project allocation as needed, watching for under-utilized or overcommitted team members.
- Find team members, skills, or roles for new projects.
- Assign people to projects.
- Sort people by role or availability.
- View the schedule by People (team member, default) or Project.
- Use the filter menu in the upper-left corner of the Schedule to switch between views.
- Use Day, Week, or Month view in the upper-left corner to zoom in or out.
- Use the arrow keys on your keyboard to scroll through the Schedule by month.
People view

People view shows team members in the left column, with projects assigned to team members across the timeline.
Availability shows as a light gray block. If the person is overbooked, red warnings appear in the schedule. Gray vertical bars indicate weekends and holidays. Use the Allocation Heatmap to identify who’s overcommitted.
Assignments appear on timesheets for each person. When you change an assignment on the Schedule, the change also appears on relevant timesheets.
Projects view

In Projects view, Projects appear in the left column, and project duration displays on the timeline.
Hover over the project to get a quick look. Select the project and then click Show Details or Hide Details.
Capacity view
In Capacity view, your selected grouping (discipline or role) appears in the left column, with group capacity and utilization across the monthly timeline.
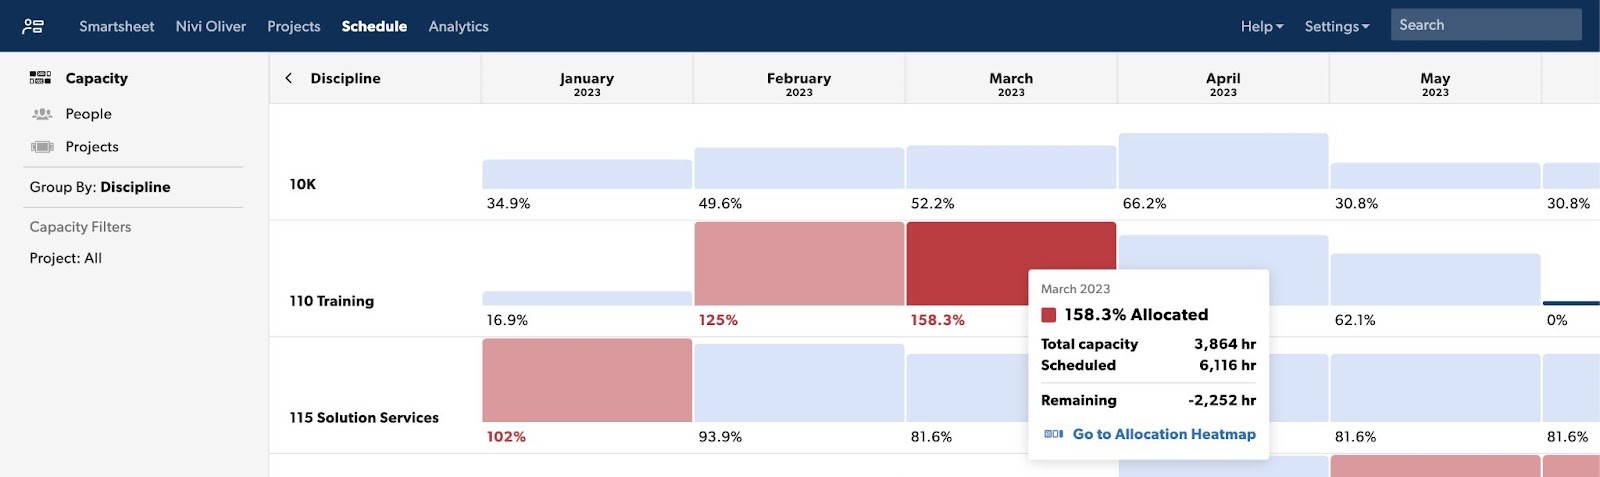
- Blue cells display the team is either at capacity or can take on new work.
- Red cells provide insights into over-utilized groups.
- Light red indicates the group is >100% and <150% utilized.
- Dark red indicates that the group is >150% utilized. Click any cell to drill down to the Allocation Heatmap and update assignments.
Learn more about capacity view.
Undo or redo an action
Undo or redo changes made to the Schedule during an active browser session. You can undo or redo up to 100 common scheduling changes, such as creating, removing, or modifying assignments.
Refreshing the page, filtering the content, or changing between People and Project views will clear your undo history.
You can't undo the following actions:
- Remove overlapping assignments.
- Split assignment.
- Repeat assignment.
- Shift project or phase.
- Change project type.
To undo or redo a change on the Schedule:
- Select Undo/Redo on the timeline bar. You can select Undo/Redo to undo or redo multiple actions.
- On your keyboard, select Ctrl + Z (PC) or Command + Z (Mac) to undo, and Ctrl + Y (PC) or Command + Y (Mac) to redo.
Use the schedule
What's on the schedule?
All project assignments for your organization are shown on the schedule.
The schedule captures the plan of record (how projects should happen) and should be modified as project plans change (based on how they actually happen). The schedule can be viewed in days, weeks, months, or you can zoom in or out to the specific view you need.
Project assignments are color-coded as follows:
- Blue: confirmed projects
- Grey: tentative projects
- Purple: internal projects
- Orange: vacation, sick leave, or other personal events (customizable in Account Settings)
Use the schedule to monitor availability or over-scheduling, and adjust individual allocations as needed. Search for people, skills, or roles to determine when to start new projects.
The schedule and the project pages work together. When you make a change to one, the other will update in real-time to reflect the implications of the change.
Capacity
Each person has a predetermined availability, set at a 100% capacity target. Capacity on the schedule appears as light gray under-capacity bars and red over-capacity bars.
- Light gray bars: show availability and the hours needed to bring the individual up to the right capacity (whatever 100% means for them).
- Red bars: show the % of hours overbooked for that person or Placeholder.
Start and end dates impact on capacity
People have zero available hours before their first day of work and after their last day of work.
For example, if a person’s “last day of work” has passed (i.e. Dec 31, 2020), any projects they’re assigned to after that date won’t show up on their timesheet or in a time & fees report.
If you remove the last day of work, they again become available for newly created or updated assignments, but this change does not automatically apply to existing assignments.
To regenerate existing assignments for the person on the schedule, change their assignment allocation from h/d, %, or total hrs to another allocation format. Their suggested hours will now appear on their timesheet and in your time + fees report.
Gantt view
To see a gantt-style view of all project timelines, go to project view, then use the dynamic zoom function (the horizontal slider bar on the upper left-hand side). In this view, projects are ordered sequentially by the start and end dates. Projects with end dates that have recently passed are at the bottom of the screen.
Comparing confirmed time to scheduled time
Assignment updates on the schedule flow to time sheets, however, confirmed time (from timesheets) does not change the schedule. This is so you can compare the actual time (from time sheets) to the plan (the schedule).
Because the schedule is the overall plan, it is not impacted by any assignments or hours your team tracks ad-hoc ( For example, sick time, or additional projects to which the person was not originally assigned).
Add people to projects
Allocate hours: fixed or flexible
Assignment allocation can be a percentage of time, hours per day, or total hours. You can use fixed hours or flexible hours.
Flexible hours
- Percentage: Assigns hours evenly as a percentage of available hours (example: Joe is assigned 30% of his time to Project A)
- Hours per day: Assigns an exact number of hours per day regardless of the person’s availability (example: Joe is assigned 4 hrs per day to Project A)
Flexible hours allow you to adjust the assignment when you change the project’s length. For example, changing a person’s assignment from 50% for 6 weeks to 10 weeks requires them to work on the project for longer.
Fixed hours
- Total: Assigns a fixed number of hours distributed proportionally to the person’s availability over the duration of the assignment (example: Joe is assigned 20 hours to Project A)
Fixed total hours keep the same number of assigned hours regardless of the assignment duration. For example, a person who was assigned to work for 100 hours on a project for 3 weeks will still be assigned 100 total hours if the project is extended to 6 weeks.
You can switch between the allocation types or to modify the plan as needed. Any edits to the Schedule automatically update the Project Page and suggested time entries on the Personal Page.
Add assignments, team members, or phases
To create an assignment on the people schedule:
- In people view, find the person you want to assign to a project. Click their row on schedule and then select New Assignment.
- Select the project or leave type you want to assign. The item will appear on the schedule.
To create an assignment on the project schedule
- In the project view, click on the project.
- From the drop down menu, choose Add Team Member.
- Select the team member you want to assign to the project.
To create a phase on the project schedule
- In the project view, click on the project.
- From the drop down menu, select Phase.
- Enter a name for the new phase.
To adjust the details for phase, team member, or assignment:
- Slide the ends of the project bar to adjust start or end dates.
- Click on a phase to add team members or set the start and end dates from the pop up calendar.
- Click on the team member to edit their allocation (for example, 20% or 10 hours per day or 50 hours total).
Edit assignments
When you edit an assignment, the Projects page and pre-populated time entries on personal pages automatically update.
- To edit an assignment, select the assignment bar.
Repeat assignments
You may need to assign the same task over and over. Repeat assignment makes this easy. Resource Management preserves the time frame and allocation in all instances of the series.
Repeat an assignment:
- On the schedule, select the assignment that you want to repeat.
- Select Repeat from the pop-up menu.
- Enter how often you want to repeat the assignment (weekly, every two weeks, etc.).
- Enter the number of times that you want to repeat the assignment.
Remove repeating assignments:
- On the schedule, select the assignment that you want to remove.
- Select Remove from the pop-up menu
- Select The Series to remove all past and future assignments in a repeating series. Select This + Future Assignments to remove the assignment that you have selected plus all future scheduled assignments. Select Only This to remove only the selected assignment (past and future assignments in the series remain).
Reassign work
When you need to allocate work differently, you can easily reassign work to another person.
- Click the assignment, and then click Reassign.
- Review resources in your organization that match the attributes of the assigned person, and then select the person, placeholder, or location that you want to reassign the work to.
Remove filters to see more resources in your organization.
Remove overlapping assignments
When you want to change a person’s assignment from multiple projects to a single project, you can remove overlapping assignments.
Removing overlapping assignments cannot be undone. Double-check your schedule before you make this change.
- Select the assignment that you want to keep.
- Select the allocation (for example, 8 h/d).
- Select Remove Overlapping Assignments.
- You’ll see a prompt asking, “Remove overlapping assignments?” Select Yes to confirm.
If you remove overlapping project assignments, all allocated hours from removed assignments go back into the project budget.
You can also remove someone from project assignments while they are on vacation. Select the vacation in step 1.
Split assignments
You might need to split an assignment into segments to accommodate availability or resolve schedule issues. For example, you’ve assigned Joe to 4 hours per day on a project for 3 weeks. As you refine the plan, you want to assign different hours for each week (6 hours for week one, 2 hours for week two, and 4 hours for week three). You need to split the project into segments, and then you can adjust the hours for each segment.
- Select the assignment in the approximate place you want to split.
- Select Allocation from the menu.
- Select Split Between Dates X and Y.
- After you split the assignment, adjust the allocation of each section of the assignment as needed. You can also move the assignment bar to different dates.