Applies to
Capabilities
Who can use this capability
Anyone but Managed Resources can enter time.
Use the timesheet
You can enter time for the entire week, track hours by category, and add notes to time entries.
Your Resourcing Administrator sets how you track time in Resource Management; you'll use one of the following ways:
- 1/2 day tracking: Designed for teams with little variation in daily activities. Tracks time in 4-hour increments.
- Hours + minutes tracking: Allows teams to confirm hours for the week or modify hours to show actual time worked.
- Itemized time tracking: Captures the most detail. Track time against categories and add notes to entries.
Resource Management suggests scheduled hours, but you should record your actual time, even when these hours differ from the plan. Tracking time accurately improves future project estimation.
1/2 Day and Hours + Minutes Tracking
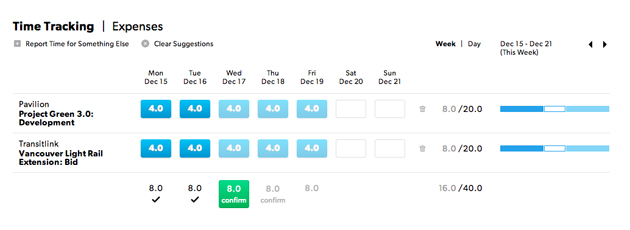
To confirm time:
- Go to your Personal Page.
- Make sure the hours are correct. Enter any changes as needed.
- Select Confirm.
You can make changes to a time entry until a Portfolio Editor or Resourcing Admin locks the hours.
- To change suggested hours, select the time entry and enter your changes.
You might have assigned time entries for more than one project in a day. When you make changes to one of your assignments, Resource Management will assume the other suggested time entries are correct. You can edit or remove these time entries separately.
- To report time for something not on the timesheet, select Report Time for Something Else, select the appropriate project, and add your hours.
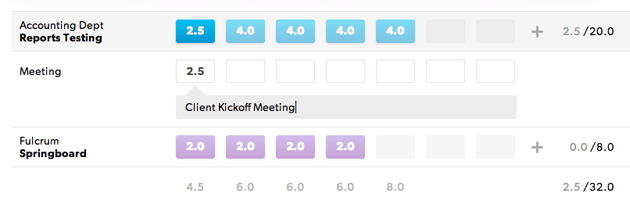
Itemized time tracking
With itemized time tracking, you can assign categories and add notes to each entry. Categories and notes help your team understand how you spend your time. Ask your resourcing admin if you don't see the categories you need.
Enter itemized time:
- Select the plus icon (+) on the project bar.
- From the dropdown, select a category or add a new one.
- Enter your time for each day and add any notes. Or, at the bottom of the timesheet select the scheduled hours to confirm them.
- Select the project row to show or hide categories for each project row.
Add notes:
Press the down arrow on your keyboard to go to the notes field.
To add multiple notes to one category on the same day, switch to day view. If a time entry that has more than one category row associated with it, you'll be prompted to switch to day view.
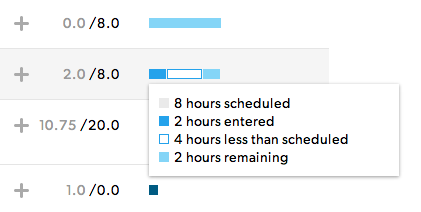
Understand budgets
In week view, hover over a bar to see closely your confirmed hours map to scheduled hours.
Clear or restore suggestions
Select Clear Suggestions at the top of the timesheet to clear all suggested hours. Select Restore Suggestions to restore them.
Delete a row
Use the trash can icon to remove rows from your timesheet.
If you track time in 1/2 days or hours + minutes, removing a row with the suggested time will clear the suggestions for each time entry in that row. You cannot remove project rows for projects or phrases that you’re assigned to.
Modify locked time
To unlock the timesheet, contact a Resourcing Admin or Portfolio Editor to understand when time entries become locked.
Confirm time for other people
Resourcing Admins and Portfolio Editors can enter and confirm time on behalf of all Licensed Users. Timesheets for Managed Resources are read-only, regardless of permission level.